How To Set Up Anonymous Guest Posting On Your WordPress Website?

If you’re looking to provide a platform for anonymous guest posting on your WordPress website,
we have a Frontend Post Submission Manager plugin to submit and manage anonymous posts from the front end with or without logging in.

With Frontend Post Submission Manager, users can easily create and submit posts, whether they’re logged in or not. This powerful yet user-friendly plugin streamlines the entire process, enhancing user engagement and driving up content generation on your site.

In this guide, we’ll walk you through the steps to set up anonymous guest posting on your WordPress site, ensuring both freedom of speech and responsible content management.

From plugin selection to moderation strategies, we’ll cover everything you need to know to establish a safe and inclusive environment for anonymous contributors.

Let’s get started by understanding the importance of anonymous guest posting.


Understanding the importance of Anonymous Guest Posting

Anonymous guest posting plays a crucial role in fostering open communication and inclusivity on your WordPress website. Allowing anonymous guest posting on your WordPress website can significantly enhance the dynamics of your online community. This anonymity can encourage hesitant individuals to participate, leading to a more vibrant and engaged online community. Moreover, it provides a platform for discussing controversial or personal subjects without fear of judgment or repercussions, ultimately enriching the depth and breadth of discussions on your site.


How To Set Up Anonymous Guest Posting On Your WordPress Website?

In this guide, we’ll walk you through the steps to set up anonymous guest posting on your WordPress site using the Frontend Post Submission Manager Plugin, ensuring both freedom of speech and responsible moderation.

Install and Activate the Plugin

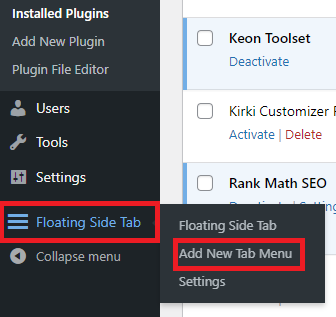
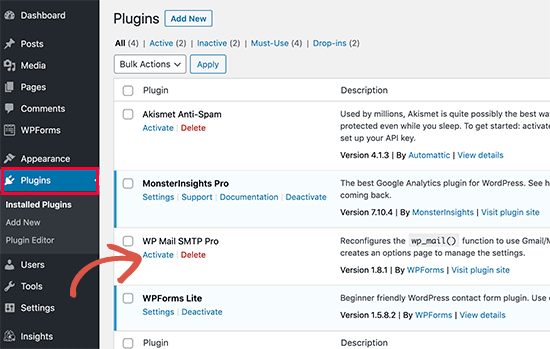
First of all, you need to go to your WordPress Dashboard and then find the plugin section and click on it.

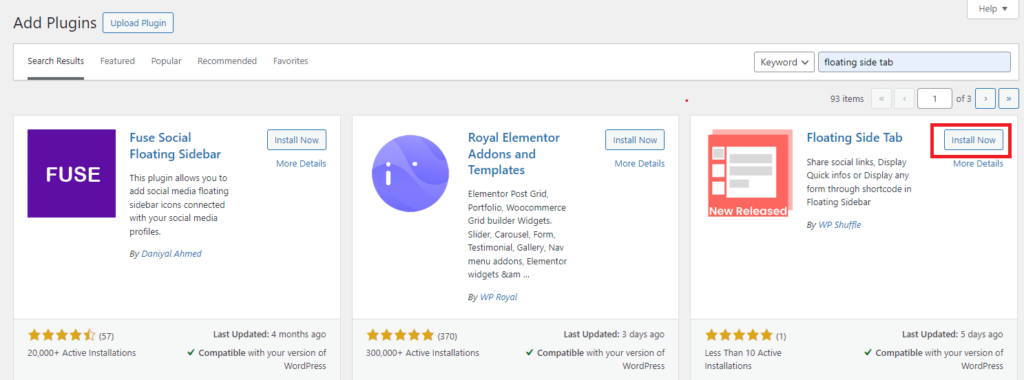
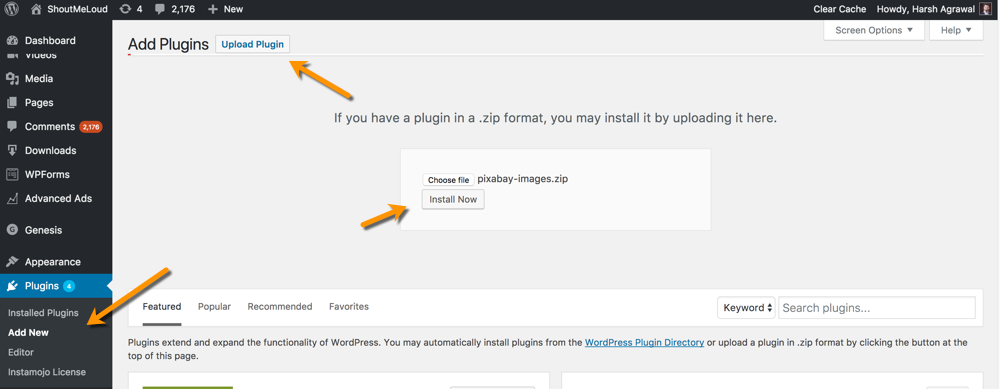
After that, you can see an add new plugin at the top left corner and click on it to add a new plugin.

Now search for the “Frontend Post Submission Manager” plugin and install it.

Installing Frontend Post Submission Manager Plugin

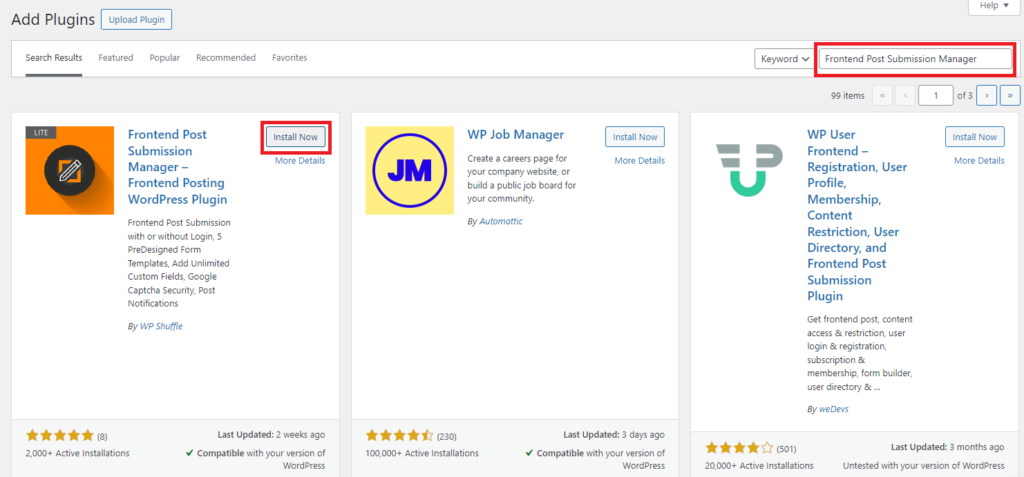
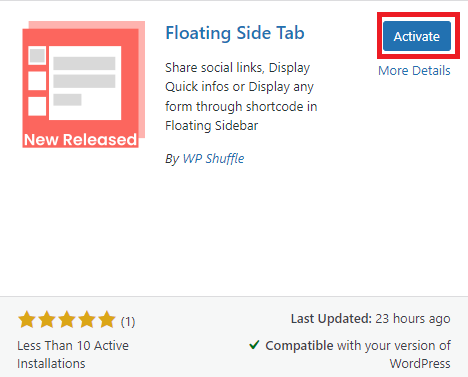
After that activate the plugin.

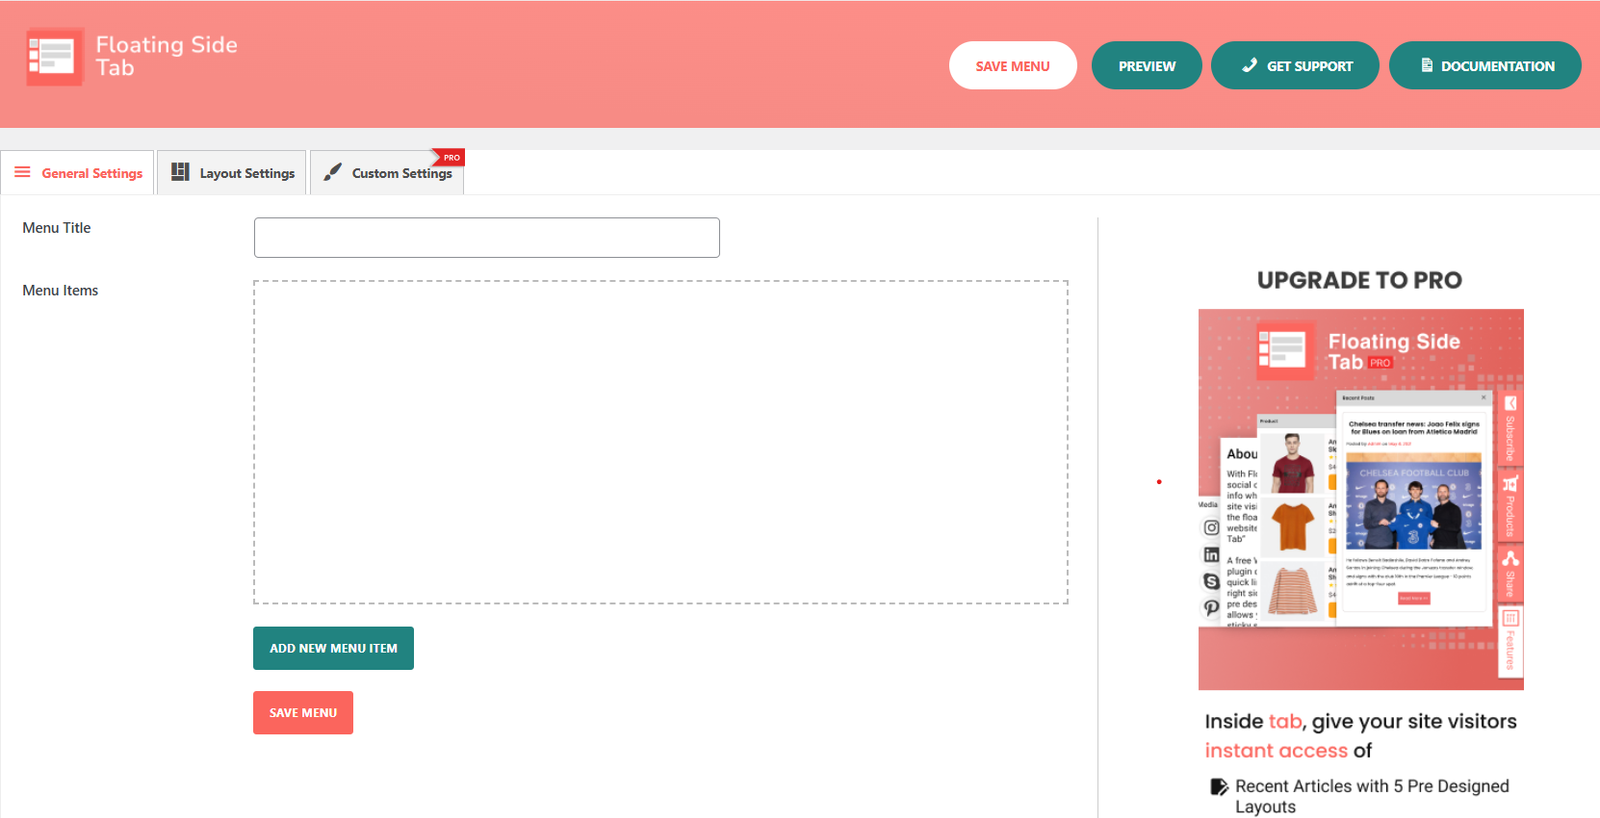
Once you’ve installed and activated the plugin, configure a form to allow guests to post anonymously. You can customize settings such as post status, validation messages, and required fields to meet your needs.

Accessing the plugin

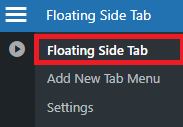
Now, you can see the Frontend Post Submission Manager plugin appear on your WordPress Dashboard then move a cursor on it, and click on All Forms.

After clicking on All Forms, you can see two available form lists i.e. Guest and Login Require Form.

Frontend Post Submission Manager Form Lists

Configuring a Form

To configure a form, you can simply click on the guest form or you can click on the edit button on the form list.

After clicking on it, you can see different available settings on the screen i.e. Basic, Form, Layout, Notification, and Security.

Many settings are available but we will use a few settings only according to the requirements to enable the anonymous guest posting form.

For setting up all the settings -> How To Set Up Guest Posting For Your WordPress Website?

Now moving forward to the basic setting.


Basic Setting

Basic Settings of Anonymous Guest Post

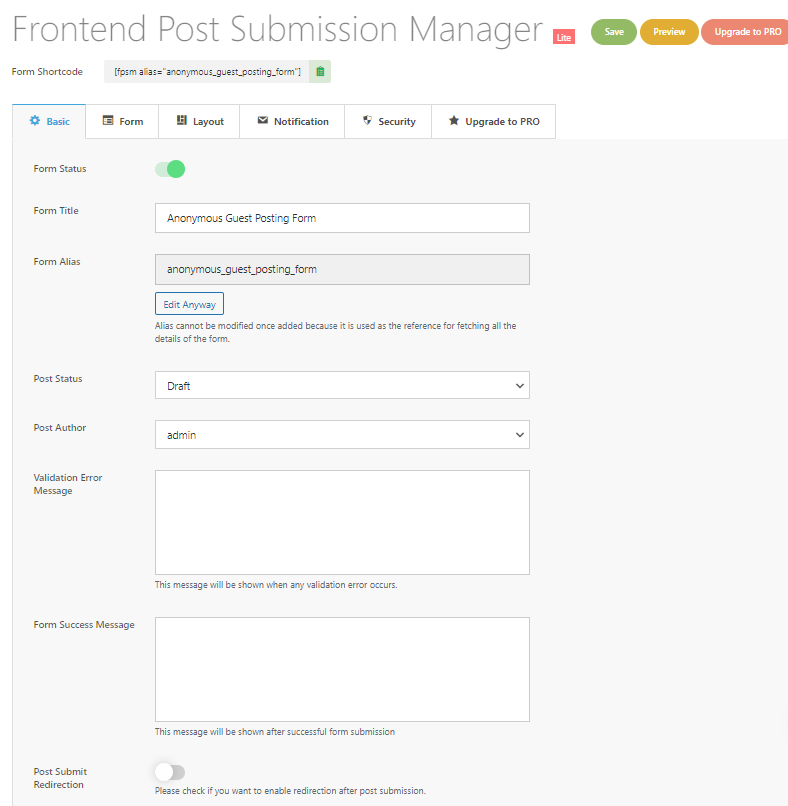
In Basic Setting, you can see the Form status which was disabled so enable the form status and then set the title of the form which will appear in frontend.

By default, the post status was set to pending review. You can configure the status of the submitted post, such as Publish, Draft, or Pending, based on your requirements.

After that enter the validation error message to display whenever the error occurs which helps the user to guide the corrections.

Then enter the form success message to display whenever the form is submitted successfully. It confirms to users that their submission was successful.

Now, heading towards the form setting.
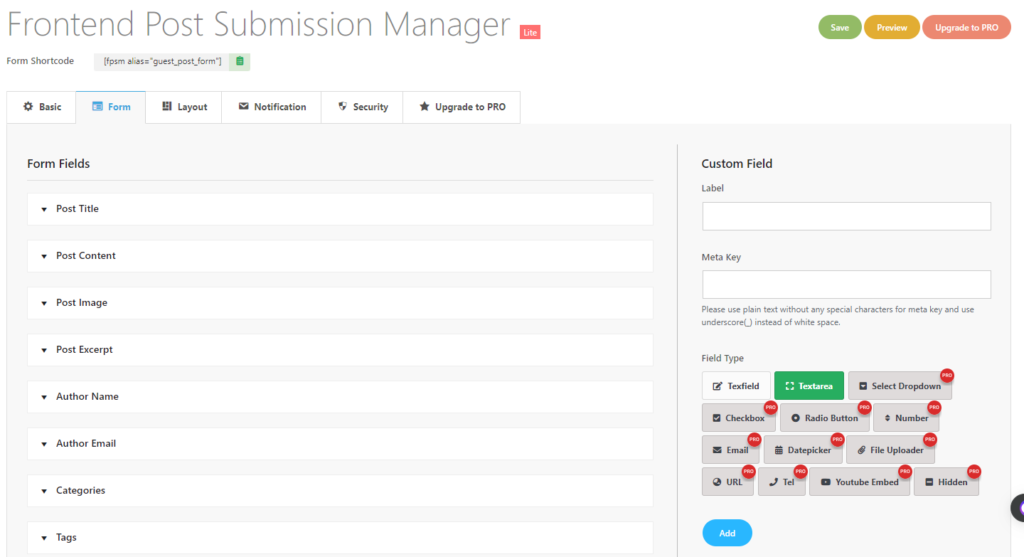

Form Setting

As you can see in the form setting, many form fields are available and to enable or set up anonymous guest posting, we will make a form with only a few important fields that are needed.

Form Setting - Anonymous Guest Posting

Post Title

At first, you can see a Post Title field, here we will open this field and enable the show on form and required option so the title of the post will appear in the form.

Post Title Option

Then enter the error required message to display on the form when the field label of the title is empty.

Add the field note and you can set the character limit for the post title and make a character limit error message so that the user can write according to the limit.
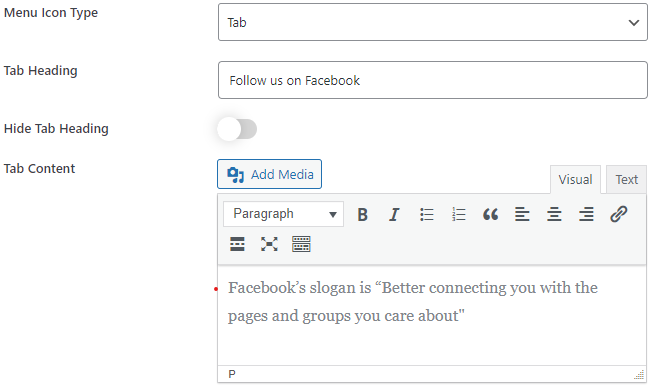

Post Content

Now it’s time to set up a post-content field. In post content, we can choose the available Editor type i.e. Simple Textarea, Rich Text Editor, Visual Text Editor, and HTML Text Editor.

Post Content

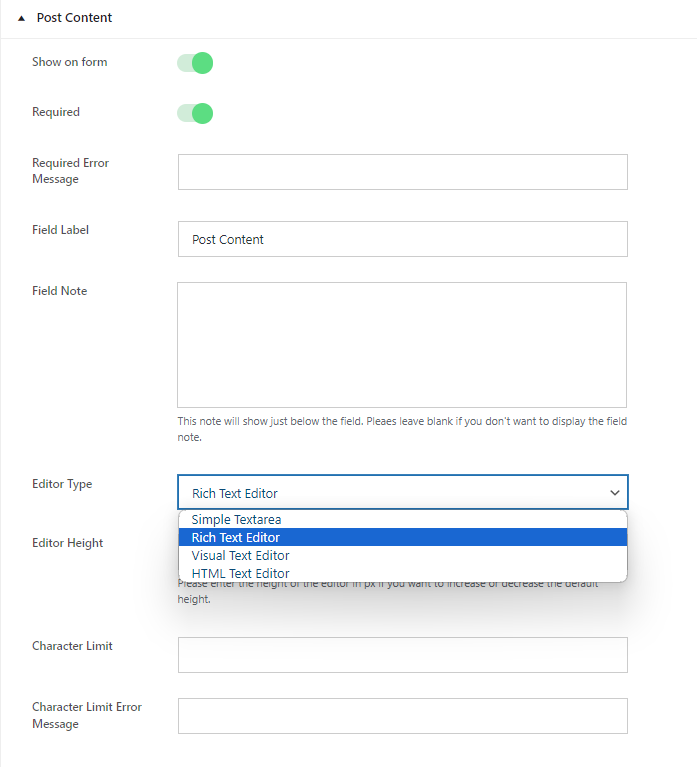
When selecting a text editor, consider your preference for simplicity or complexity.

A basic textarea offers straightforward functionality, while a rich text editor provides both HTML and visual versions with editing tools.

Opt for a visual text editor if you prefer a WYSIWYG interface without HTML options, and choose an HTML text editor if you prefer working solely with HTML, devoid of visual elements.

Each option caters to different editing needs and preferences.

Optionally, set a character limit for post content.

Save changes after configuring settings.


Post Image

Post Image

Toggle “Show on Form” to display or hide the “Post Image” field as needed.

Choose if it’s required or optional. Define the “Field Label” for clarity. Add instructions or notes in “Field Note” for users.

Customize the “Upload Button Label” to prompt image uploads.

Optionally, set a file size limit with “Upload File Size Limit” and specify the error message for exceeding this limit with “Max Size Error Message”.

Now after setting up the post title and post content field, open the “Author Name and Author Email” fields.


Author Name and Author Email

To enable or set up anonymous guest posting on your WordPress website, you’ll need to adjust the settings to allow submissions without requiring users to provide their name and email.

Author name and email

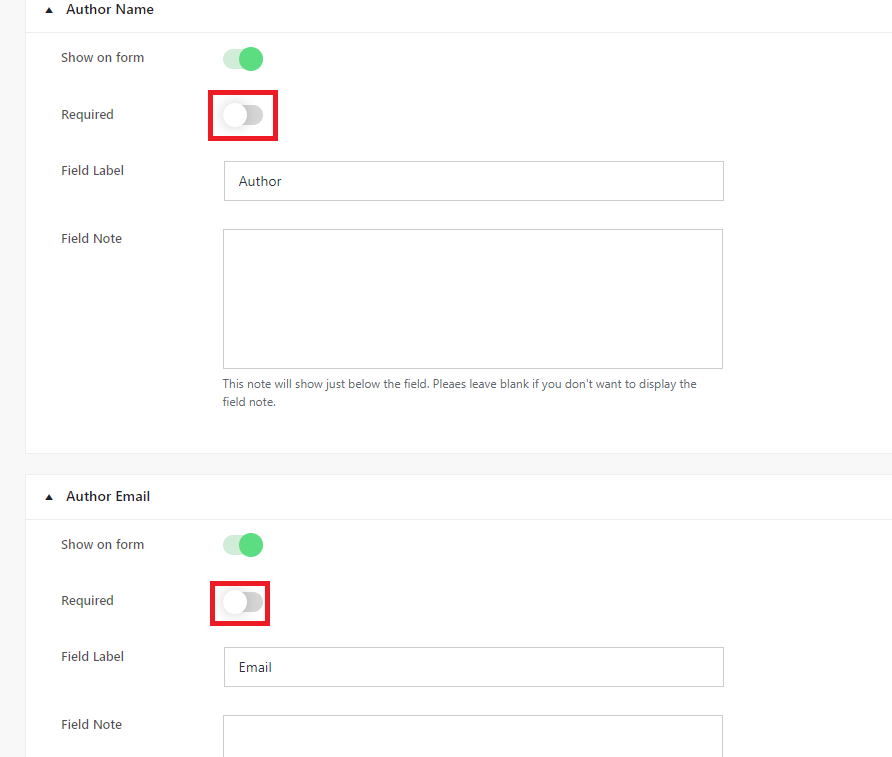
This essentially means disabling the required fields for “Author Name” and “Author Email.” By doing so, users can submit posts anonymously without needing to disclose personal information.

After setting up the form settings, click on save.


Using the Shortcodes

Guest Post Shortcodes

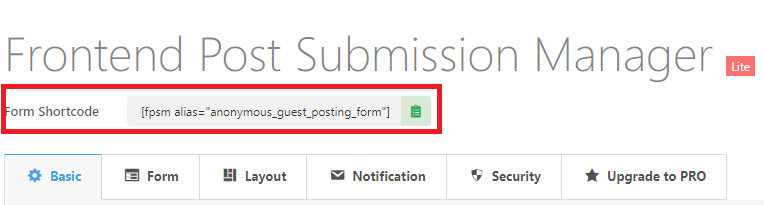
Now, copy the shortcodes from the above.

Go to pages and click on add new pages.

Pasting Shortcode of Anonymous guest posting form

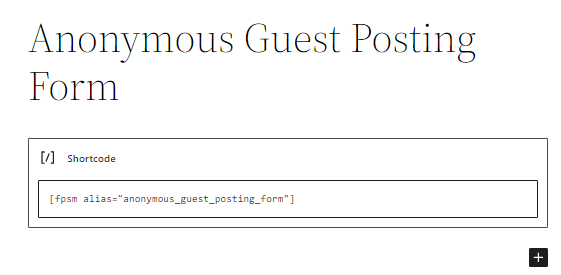
Then paste the shortcode and publish it.
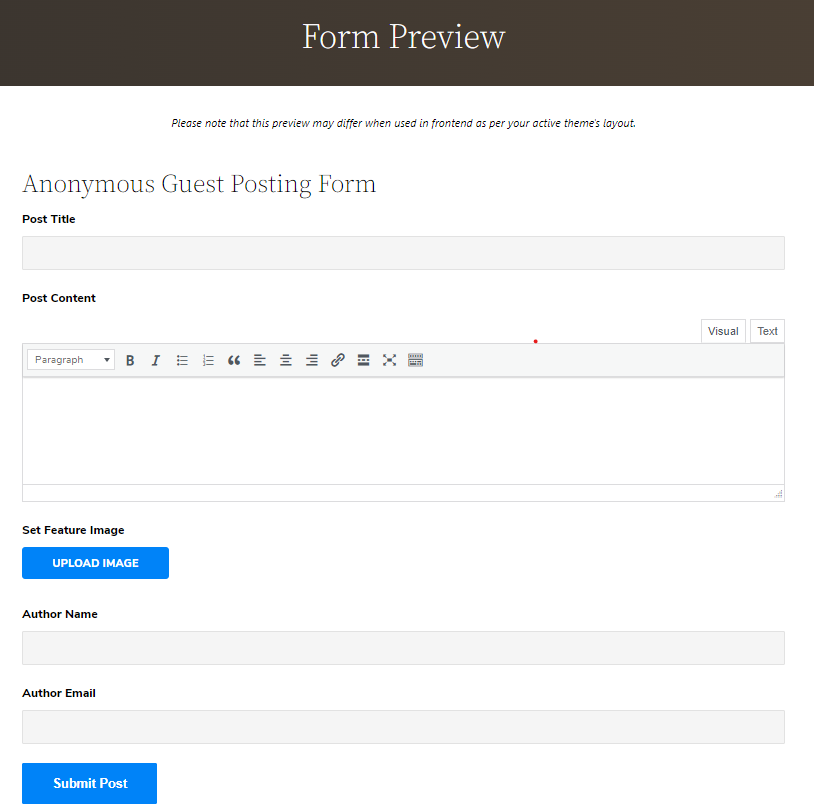
Preview of the form

This is how the Anonymous Guest Posting form looks like after publishing it.

Preview of Anonymous Guest Posting Form

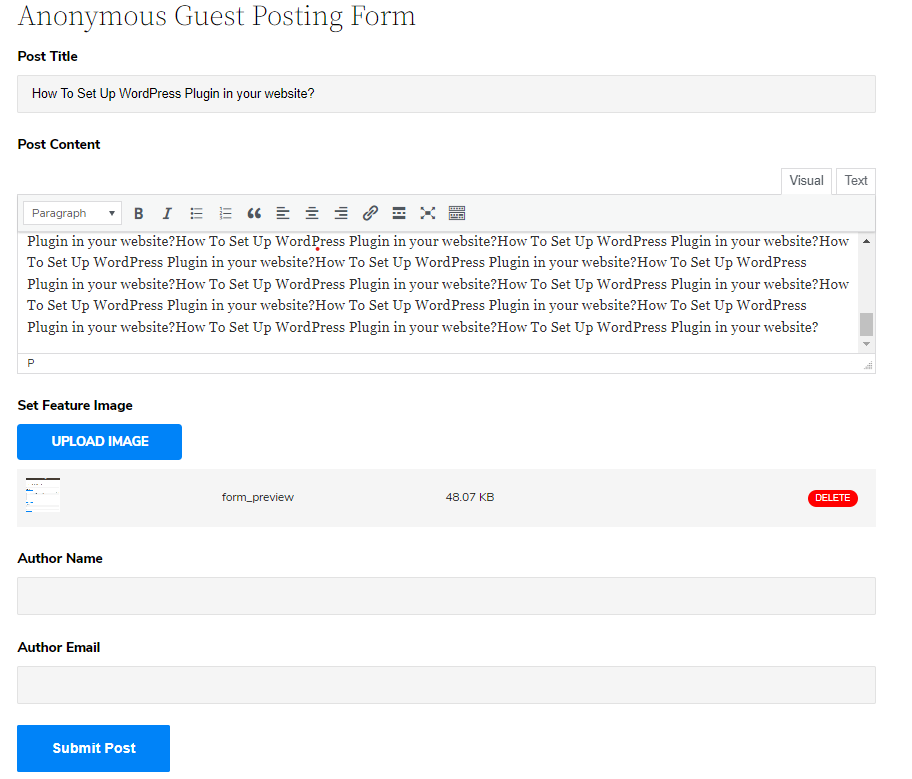
When an anonymous user fills up the form and submits the post. This is how the form will look like.

Preview of form display
Form submission successfully

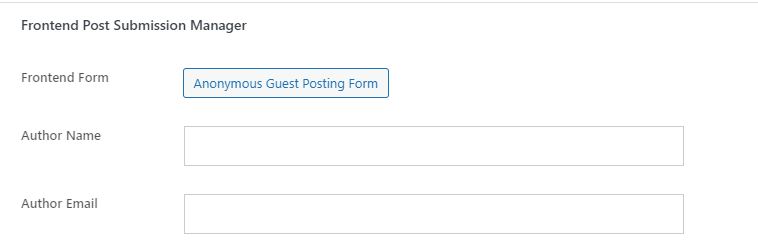
Now go to the dashboard and click on the post, there you can see the post was in draft.

Pending Post

Now click on it and then you can see the frontend post submission manager where the author name and email are empty.

anonymouse form

By following these steps, you should be able to set up anonymous guest posting by using the Frontend Post Submission Manager lite plugin seamlessly into your WordPress site.

Conclusion

Setting up anonymous guest posting on your WordPress website can greatly enhance the inclusivity and diversity of your online community, fostering open dialogue while protecting user privacy. By utilizing the Frontend Post Submission Manager plugin, you can create a seamless experience for anonymous contributors while maintaining control over content moderation.

Throughout this guide, we’ve outlined the importance of anonymous guest posting in facilitating authentic expression and meaningful discussions. We’ve also provided step-by-step instructions on installing and configuring the plugin to enable anonymous submissions.

By following these instructions, you can establish a safe and inclusive environment where users feel empowered to share their thoughts and perspectives without fear of judgment or repercussion. Remember to implement moderation strategies to ensure responsible content management and safeguard against abuse.

With careful consideration and the right tools in place, you can create a vibrant and engaged online community where diverse voices are valued and respected.

How to add a floating side tab to your website?

Are you aiming to make your WordPress website more user-friendly? 

I was wondering how to incorporate floating side tabs for smoother navigation. 

Look no further! In this guide, we’ll walk you through the simple steps to add a floating side tab and enhance the user experience effortlessly. 

Let’s take a moment to understand what floatingside tabs are all about. Imagine little interactive buttons that stick to the side of a webpage, typically on the left or right. These tabs stay put even when you’re scrolling through the page. 

They’re like shortcuts that give you quick access to important stuff without getting in the way of what you’re reading or looking at. 

Certainly! They function as reliable companions, consistently available to offer assistance as you navigate the web.

Let’s dive in and make your website even more engaging!


How to add a floating side tab to your website?

To add a floating side tab plugin to your WordPress website through the dashboard, follow these steps:

Step 1: Navigate to your WordPress dashboard and select “Plugins” > “Add New.”.

Step 2: Search for the search bar located in the top right corner to search for the desired plugin. A list of results will populate.

Step 3: After finding the plugin you want in the results, click on “Install Now.”. Alternatively, you can click on the plugin’s name to access more detailed information about it.

installing floating side tab

Step 4: After installing the plugin, you must activate it to utilize its features. Once the installation process is complete, which typically takes just a few seconds, simply click on the “Activate” button.

Download the Floating Side Tab

Activate the floating side tab plugin

Additionally, you have the option to activate or deactivate any plugin by navigating to “Plugins” > “Installed Plugins” in your WordPress dashboard. From there, you can easily manage the status of your plugins with just a few clicks.

To understand the installation process for the floating side tab plugin, you can also watch this video video below:


How do I use the floating-side tab?

Once the plugin is successfully installed and activated, you’ll notice the Floating Side Tab menu added to the left admin menu.

You can simply click on this menu to access the plugin’s settings page. From there, you can configure and customize the floating side tab according to your preferences.

adding a floating side tab

Click on “Floating Side Tab” to see the dashboard of the floating side tab.

Within the dashboard, you’ll find a list of tab menus allowing you to add, edit, delete, and preview them. You can either add a new menu directly from this section or navigate to the floating side tab and add it from there.

click on floating side tab

To add a new menu, you can click on the “Add New Tab Menu” option and then customize the settings according to your requirements.

After clicking on “Add New Tab Menu,” you can see 2 different settings below:

  1. General Setting
  2. Layout Setting

General Settings

This section appears to include several different options for customizing menus or settings.

General Setting
  • Menu Title: This option allows you to set the title of the menu.
  • Menu Items: This option refers to the different items that will be displayed in the menu

To add a new menu item, you need to follow these steps:

Step 1: First of all, you need to set the title of the menu.

Step 2: Now click on add a new menu item, and it will display the menu icon in the field of menu items.

Step 3: After clicking on “Add New Menu Item,” a new untitled menu icon will appear. Each time you click on the “ADD NEW MENU ITEM” button, a new untitled menu icon will appear.

Here is the image in which the untitled menu icons are shown in the field of the menu item when we click on the “ADD NEW MENU ITEM”.

Add new menu item

Step 4: Now, you need to open that “Untitled menu icon”. As you can see there are additional submenu items or further options available when the user clicks on that particular menu item. 

This includes managing Tab Name, Tooltip Text, Icon Picker Type, Icon Picker, Menu Icon Type, Tab Heading, Hide Tab Heading, and Tab Content are presented below.

  • Tab Name: This field is used to display the tab name on the front end.
  • Tooltip Text: Input text to display as the tab’s tooltip.
  • Icon Picker Type: Choose from various icon pickers, such as Font-Awesome Icons.

Here are the 2000+ font icons that are available to pick for your website sidebar:

Universal icon picker

As you can see, there are 3 Font Awesome i.e. Solid, Regular, and Brands. From here, you can choose the icon to display in your sidebar.

Alternatively, you can select “Custom Icon” to upload your icon.

custom icon

After uploading a custom icon,

add to cart
  • Menu Icon Type: There are two types of menu icons available: Tab type and Link type. Choose the one that fits your preferences and design.

After selecting Tab from the menu icon type, it enables the tab content, where you can write your content to display in the tab.

tab content
  • Tab Heading: You must choose the tab option in the menu icon type to enable the tab heading option.
  • Hide Tab Heading: Enabling this option will hide the tab heading.

If you choose link type in the menu icon type, it can be useful for displaying social media icons like Facebook, Twitter, Instagram, etc with links.

Step 5: After filling out all the fields and selecting the option, click on the“Save Menu” button to add the menu item to the menu list.

save floating side tab

Next, we’ll navigate to the layout settings to adjust the arrangement or layout of the menu or page elements.


Layout Settings

This field may allow you to adjust the layout or arrangement of the menu or page elements.

Additionally, you have the option to manage layout settings. You’ll find options for menu positions, templates, icon animation, and hiding menus on mobile devices within the layout settings section.

  1. Menu Position: This field provides options for positioning the menu on the page. Based on the context, it appears there are at least two options: “mid-left” and “mid-right.”
  2. Choose Template: This field allows you to choose from different templates for the menu’s appearance. Based on the context, there are at least 8 template options available.
  3. Icon Animation: This field may allow you to choose animation effects for the menu icons. It provides only one icon animation, i.e., a slide.
  4. Hide in Mobile: This field allows you to choose whether or not to hide the menu when viewing the page on a mobile device.
Layout Setting

Step 6: Next, you need to select all the given options to display on the website.

In the above image, we have shown the selected option.

Step 7: After selecting all the options, click on “Save Menu.”

Step 8: After clicking on “Save Menu,” you can see the “Menu List” button at the “Top-right” position, where you can see a list of the menu.

menu list

Step 9: After clicking on the “Menu List” button, you’ll see the list of tab menu items that you’ve created.

Finding the list of menus in your WordPress dashboard is straightforward. Simply click on the floating side tab, and you’ll see the list of tab menu items that you’ve created. From there, you can also easily add, edit, delete, and preview menus directly from the list.

Now moving toward the display settings, we can customize the menu visibility and location on different pages of the website for tailored navigation


Display Settings

Display settings allow you to control where and how a menu appears on different pages of your website.

Step 10: For display settings, first you need to go to the floating side tab, and then there you will see settings. After that, you can click on “Settings.“.

Setting display

Step 11: After clicking on “Settings”, you will see the menus you want to display on the page.

You can customize menu display settings for different pages of your site:

  1. Homepage: Choose a menu to display on the homepage.
  2. Archive Page: Select a menu for the archive page.
  3. Display on Post: Choose a menu for individual post pages.
  4. Display on Page: Select a menu for regular pages.
  5. Display on attachment: Choose a menu to display on attachment pages.

Step 12: Under this setting, you will have the option to select the menu. On different pages, you can display different menus that you have created.

Display Setting

For example, if you choose Menu 3 from the menu option on the homepage, that menu will only appear on the homepage’s sidebar. For other posts, pages, and attachments. Repeat the same steps to display a menu.

You can select the specific menu you’ve created for each page to display different menus on various pages.

Step 13: After selecting the menus, click on “Save Settings.”

Here’s how to add a floating side tab to your WordPress website. Once added, you can use the same process described above to add the required menus. This plugin supports unlimited menu possibilities, so download it now and start creating your menu lists.


Conclusion

I’m confident you’ll appreciate this plugin and its menu method for adding a floating side tab to your WordPress site effortlessly. It’s a simple yet effective solution.

Are there any plugins out there that surpass this in terms of power and functionality?

Feel free to drop your recommendations below. I’m eager to explore them, and if I’m impressed, I’ll gladly share my thoughts and reviews in future posts.


How to install WordPress Plugin?

Want to build a WordPress website for your business or portfolio? You need to select a powerful plugin that is integrated with attractive features. There are various methods to install WordPress Plugin.

There are thousands of plugins available in the WordPress directory. You can go through the list and get the one as per your requirement. If you are a beginner, you can try the free one. And for an advanced upgrade to the premium plugins

WordPress plugins are the most essential elements for customizing your website. They allow you to add new features to WordPress like a gallery, contact form, templates, slideshow, shopping cart, and more. 

At first, you need to install WordPress and then you can go for the plugin installation process. Here you need to know one thing, if you are using WordPress.com, you cannot install plugins. You need to upgrade to their business plan to use any plugin. But, if you are starting with the WordPress.org website, you are free to install any plugin. 

Since you are about to install a plugin for your WordPress website, you need to know which type of plugin is suitable for you. So you need to look for the following features before you install any plugin:

Features Required for Powerful Plugin

  • Speed the blog
  • Secure the blog
  • Schedule full backups
  • SEO Optimization
  • Manage teams and editorial process
  • Grow the email list

Besides this, you also need to look after the number of downloads, Average rating, Reviews, Support activity, and Developer details. With this, there are great possibilities to get a powerful plugin. 

I am focusing on several features of a plugin because if you select the wrong one, you may have to regret it later. A wrong plugin can cause an error in the site which will slow down your server. Also, your site may be attacked by malicious code. With these all, you may lose your traffic. So, think twice before selecting any plugin.

Well, I think, you are now prepared to choose your plugin. So the question is, how to install the plugin? There are different methods to perform this task. Today in this article, we are going to discuss the 3 best methods. Go through all of these and install your plugin through any of them at your ease. 

So let’s get started:

How to Install WordPress Plugins From the Official Plugins Directory?

One of the easiest methods to install a plugin for your WordPress site is through the official plugins directory. It is mainly for beginners, but anyone can go through this. 

If you have decided to go through the plugin upload method, remember, that paid WordPress plugins cannot be installed through this process. So if you are about to install the premium plugin, go for other methods. Since premium plugins are not listed in the directory, you cannot upload those.

Let’s see how one can install the plugin through the plugin directory:

  • Login to your WordPress dashboard
  • Navigate to Plugins
  • Click on Add New
  • Search for the plugin that you want to install by typing in the Keyword box
  • Once you find the plugin, click on the Install Now button
  • When the installation process is done, press the Activate button
search plugin
activate plugin

With this, you can install your plugin for your upcoming website. Now, let’s check whether the process is completed or not. For this, you need to configure the settings of your installed plugins. For this go through the following few steps:

  • Go to the WordPress admin panel
  • Head to Plugins
  • Go to Installed Plugins
  • Search for your installed plugin
  • If the plugin is available there, it means your task is done successfully 

How to install a Plugin using the WordPress Admin Plugin Upload?

The second method to upload a WordPress plugin is through the upload method. Like the above method, it is also easy to go through. Beginners can also use this method and install a plugin for their website. 

As we mentioned, premium plugins cannot be installed from the first one, you can go for the upload method to install the premium plugin for your site.

So, let’s see how to use the upload method to install the WordPress plugin:

  • At first, download the zip file of the plugin from the source 
  • Now, go to the WordPress admin area 
  • Visit Plugins section
  • Click on Add New page
  • Go to the top of the page and click on the ‘Upload Plugin’ button 
  • Now, click on the ‘Choose File’ button 
  • Select the plugin file you downloaded earlier to your computer
  • Click on the ‘Install Now’ button
  • Once the installation is completed, click on the Activate Plugin
upload plugin

How to install Plugin through FTP Client?

Finally, the last one is through the FTP Client. This process is quite complete, as it goes through a huge process. Beginners may/ may not follow this method. But if you are an expert and familiar with these all, you can go through them.

So here we go, how to install the plugin through FTP:

  • Download your zip file of the plugin from the directory
  • Unzip the plugin file
  • Save the content to a folder
  • Establish an FTP connection to your hosting account
  • Navigate to the Remote Site panel
  • Scroll down and locate wp-content
  • Click on the Plugins button
  • Go to the Local Site panel
  • Open the folder where you store the plugin’s files
  • Upload the extracted files of the plugin
  • Once all the files are transferred, click on the Plugins button
  • Go to the installed plugin section
  • Search for your installed plugin and click on the activate button
ftp client

In this way, you can install your WordPress plugin through the FTP client process. 

Conclusion 

Well, we have described all three methods with which you can install a plugin for your WordPress website. The first two are beginners friendly. The last FTP client is quite vast, so it will be best for the expert. 

If you go through the above methods carefully, you can install the plugin very easily and quickly. We have mentioned each step-by-step process so that our visitors get it easier.

Hopefully, you all get the article helpful to you. In case you have any confusion or queries regarding any of the above installation processes, feel free to contact us. You can send us your questions through the comment section or contact us directly. We will get back to you as soon as possible.

Keep supporting us and follow us on Facebook and Twitter to get more interesting articles.