Looking to set up guest posting on your WordPress website to expand your reach and engage with a broader audience?
Guest posting can be an invaluable strategy. By allowing other writers to contribute content to your WordPress website, you not only enrich your site with fresh perspectives but also foster collaborations within your niche community.
Setting up guest posting may seem overwhelming, but it can be a seamless process with the right tools and strategies.
In this blog post, we’ll explore how to leverage plugins to streamline the guest posting workflow on your WordPress site, making it easier for both you and your contributors to create and publish content.
Let’s start by understanding the concept of guest posting before we delve into setting up guest posting for your WordPress website.
What is Guest Posting?
Guest posting is essentially contributing content to other blogs within your niche. This practice not only draws attention to the author’s website or personal but also fosters industry recognition.
Enabling guest posting on your WordPress website involves allowing contributors to submit content directly to your site, creating a mutually beneficial arrangement within your niche community.
Additionally, guest authors gain valuable backlinks to their website and social media profiles, enhancing their branding efforts. It’s a highly effective strategy for expanding reach and establishing authority in the field.
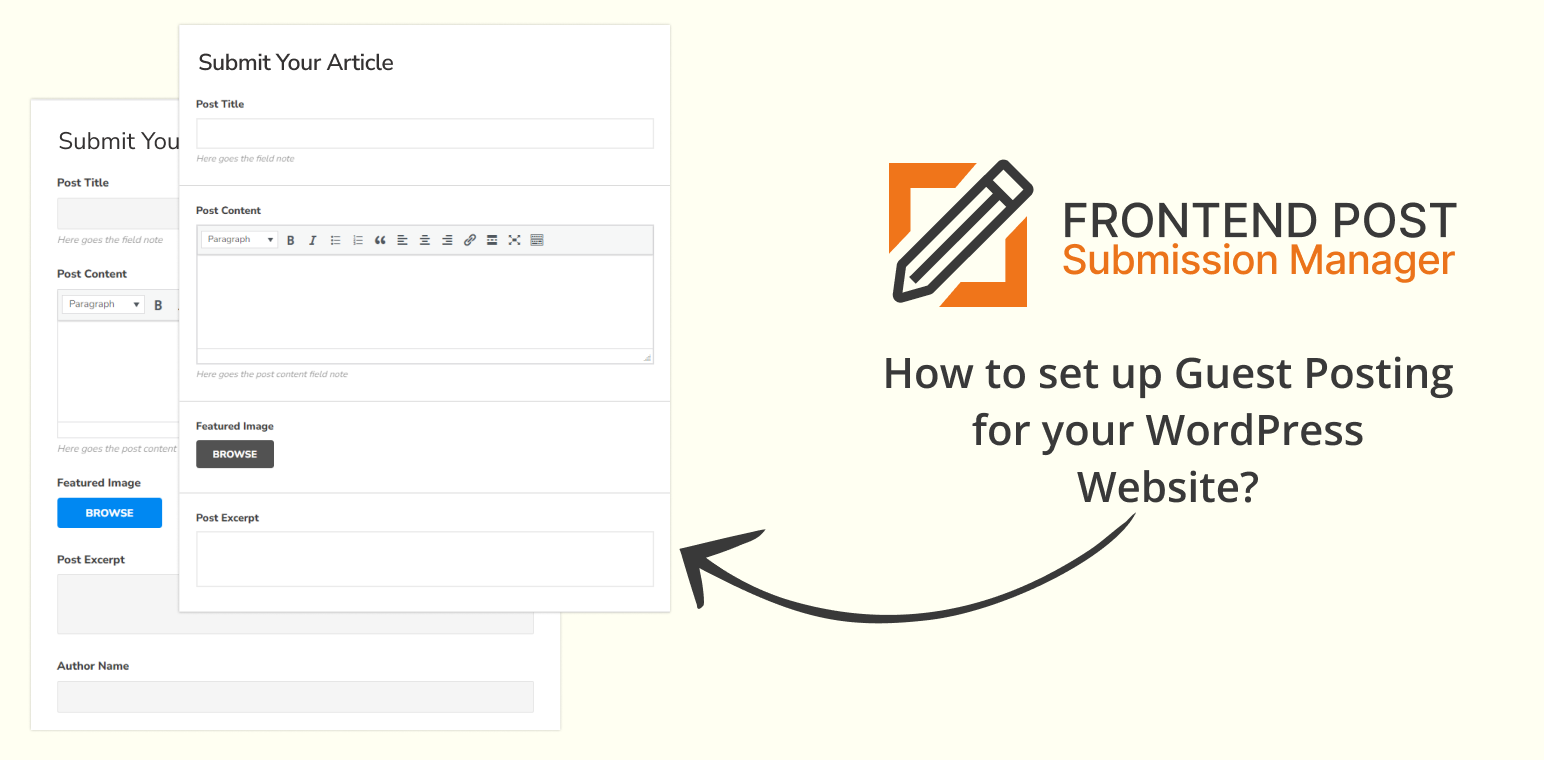
In this guide, we’ll explore how to set up guest posting for your WordPress website using a guest post WordPress plugin named “Frontend Post Submission Manager Lite” to streamline the process and maximize its benefits.
Table of Contents
Frontend Post Submission Manager Lite
The Frontend Post Submission Manager Lite is a robust and intuitive WordPress plugin, that offers seamless posting directly from your website’s front end. It’s completely free and designed to streamline the process of submitting posts. With this tool, users, whether logged in or not, can effortlessly create and submit posts, boosting user engagement and content creation on your site.

Features
- Drag and Drop Form Builder: Simplifies the creation of custom submission forms.
- Unlimited Custom Fields: Offers flexibility in collecting diverse data with various field types.
- Frontend and Backend Display: Ensures easy access to custom field data for both users and administrators.
- Pre-Designed Templates: Provides visually appealing options to enhance form aesthetics.
- Guest Post Support: Encourages guest contributors to submit content, fostering engagement.
- Secure Form Submission with Google Captcha: Guards against spam with Google Captcha integration.
- Notification Configurations: Allows customization of notifications for admin and users.
- Frontend Form Preview: This enables users to preview form entries before submission.
- Redirection after Successful Submission: Offers a seamless experience by redirecting users to specific pages post-submission.
- Configurable Post Status: Provides flexibility in configuring post status, author, and format.
- Character Limit Configuration: Allows setting character limits for content submissions.
- Enable/Disable Form Components: Tailors the form by enabling or disabling specific components.
- Ajax Form Submission: Ensures real-time submissions with smooth Ajax form functionality.
- Developer Documentation Available: Offers resources for developers to customize the plugin.
- Device and Browser Compatibility: Optimized for universal accessibility across all devices and browsers.
- Translation Ready: Facilitates expansion to global audiences with translation-ready features.
With its user-friendly interface and extensive feature set, Frontend Post Submission Manager Lite appears to be a valuable tool for websites seeking to enhance user engagement and streamline content generation.
How To Set Up Guest Posting For Your WordPress Website?
Enabling or setting up the Guest Posting with the Frontend Post Submission Manager plugin lite seems straightforward. Here are the steps:
Step 1: Install and activate the plugin
- Navigate to your WordPress dashboard.
- Go to the “Plugins” section and click on “Add New Plugin“.
- Search for ‘Frontend Post Submission Manager‘ and install it.
- Once installed, activate the plugin.
Step 2: Accessing the Plugin
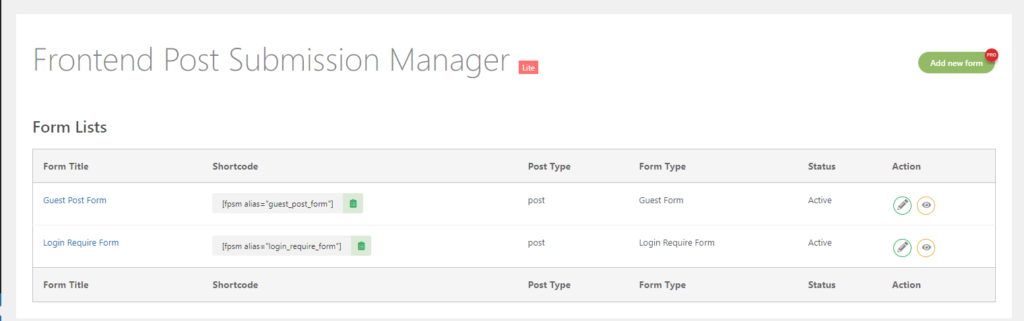
- After activation, you’ll see the ‘Frontend Post Submission’ option on your WP dashboard. Click on it.
- After clicking on it, you can see two form lists i.e. Guest Post Form and Login Required Form on your screen.
Step 3: Configure a Form
- Within the plugin interface, you’ll find options to edit forms as desired.
- To configure a Guest Post Form, Click on it.
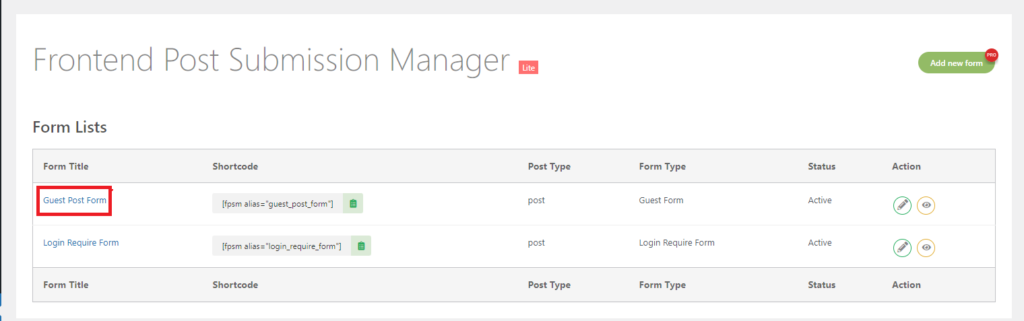
- After clicking on it, you will land on Basic Settings.
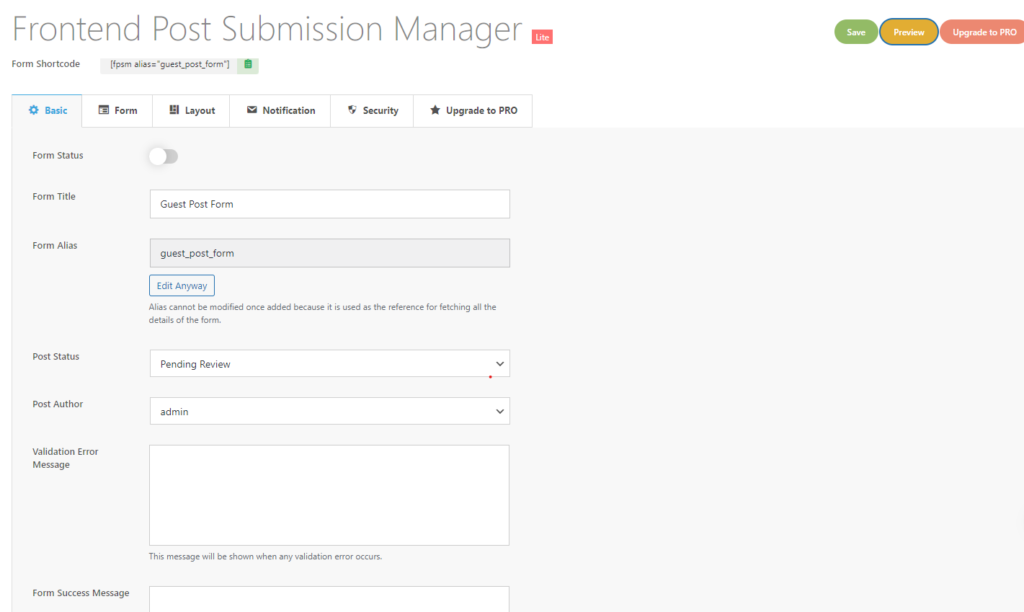
Step 4: Basic Setting
- Here you can see many fields i.e. Form Status, Form Alias, Post Status, Post Author, Validation Error Message, Form Success Message, and Redirection.
Let’s summarize each setting:
- Form Title: This is the title given to the form while creating it. It helps identify the form within the plugin interface.
- Form Alias: The alias is given to the form while creating it. This alias is used internally by the plugin to fetch settings and list posts in the frontend post management dashboard. It’s not recommended to edit this alias.
- Post Status: Configure the status of the submitted post, such as Publish, Draft, or Pending, based on your requirements.
- Post Format: This option lists all post formats supported by your active theme. If your theme doesn’t support post formats, this option might not be available.
- Validation Error Message: Enter the message to display when any validation error occurs in the form. This helps guide users in correcting errors.
- Form Success Message: Enter the message to display upon successful form submission. It’s a way to confirm to users that their submission was successful.
- Redirection: Enable redirection after successful form submission. There are two types of redirection:
- Redirect to Published Post: Automatically redirect users to the published post after submission.
- Custom URL Redirection: Redirect users to a custom URL specified by you after submission.
These settings allow for customization and control over the behavior and messaging of the form submission process.
- After that click on Form.
Step 5: Form Setting
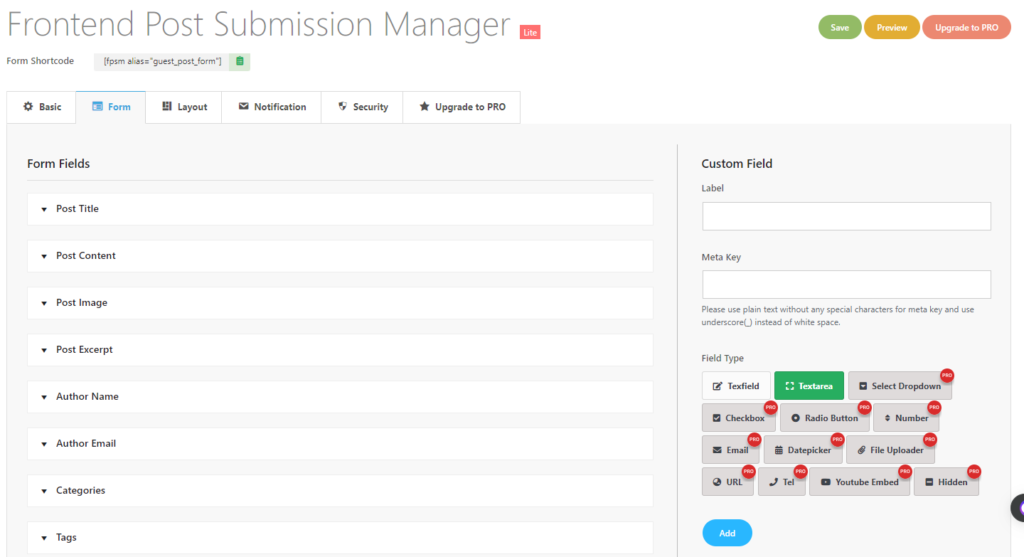
- Now, here you can see many form field options which are available in this section.
- In this section, there are many available form fields i.e. Post Title, Post Content, Post Image, Post Excerpt, Author Name, Author Email, Categories, and Tags.
Post Title
Now, you need to open that “Post Title”. As you can see there are many fields or further options available when the user clicks on that particular form field.

- Here, you have the option to toggle the visibility of the form field using the “Show on Form” toggle. Additionally, you can set the field as required or optional by toggling this option as needed.
- Following that, you’ll find fields for “Field Label” and “Field Note”.
- The Field Label is what will be displayed on the form when it’s used on the front end, while the Field Note provides additional information that will appear just below the field.
- If necessary, you can set a character limit for the post title.
- If the character limit is exceeded, an error message can be displayed in the “Character Limit Error Message” field.
Post Content
In post content, here are the available options:
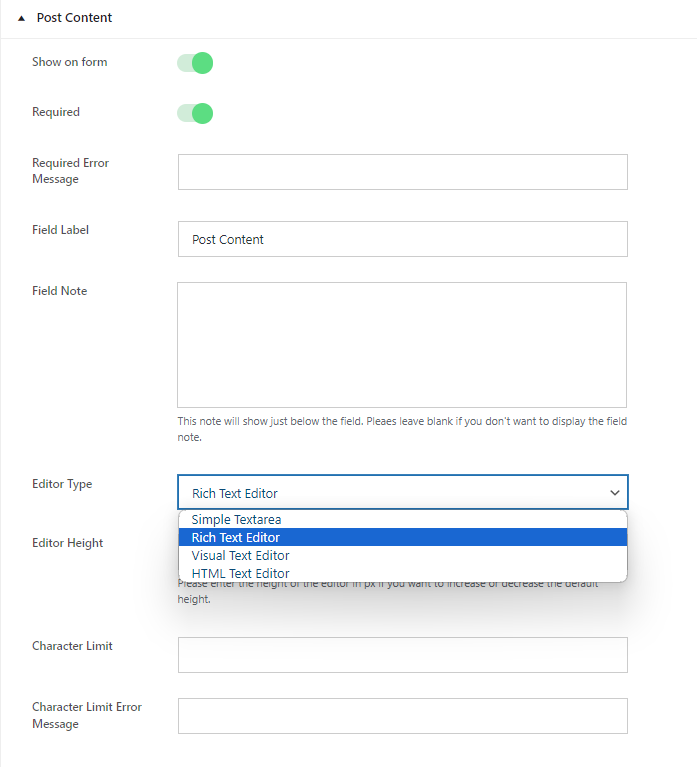
Certainly! Here are the steps:
- Open the “Post Content” Field: Begin by accessing the “Post Title” field within the form editor.
- Select Editor Type: Within the options for the “Post Content” field, locate the “Editor Type” options.
- Choose Editor Type: From the available options, select the desired editor type based on your requirements:
- Simple Textarea: Choose if you prefer a basic textarea without editing tools.
- Rich Text Editor: Opt for this if you want a WYSIWYG editor with both HTML and visual versions, including text editing tools.
- Visual Text Editor: Select if you want a WYSIWYG editor with only a visual version, without an HTML option.
- HTML Text Editor: Choose if you want a WYSIWYG editor with only an HTML version, without a visual interface.
4. Set Character Limit (Optional): If required, specify a character limit for the post content within the “Character Limit” setting.
5. Save Changes: After configuring the desired settings, save your changes to apply them to the form field.
Post Image

Here’s a structured guide for the “Post Image” field:
- Show on Form: Toggle the option to enable or disable the display of the “Post Image” field on the form according to your requirements.
- Required: Choose whether the “Post Image” field is mandatory or optional by toggling the required option as needed.
- Field Label: Enter the label text that will be displayed on the form for the “Post Image” field when used on the frontend.
- Field Note: Provide any additional information or instructions regarding the “Post Image” field. This note will be displayed just below the field on the form.
- Upload Button Label: Specify the label text for the image uploader button, indicating to users that they can upload an image.
- Upload File Size Limit: If desired, set a size limit for the uploaded image to restrict the file size. Enter the maximum file size allowed for the uploaded image.
- Max Size Error Message: Enter the error message to be displayed if the uploaded image exceeds the specified file size limit.
After customizing these options, save your changes to apply the settings to the “Post Image” field. This structured approach ensures that the “Post Image” field is configured according to your specific needs and preferences.
Post Excerpt
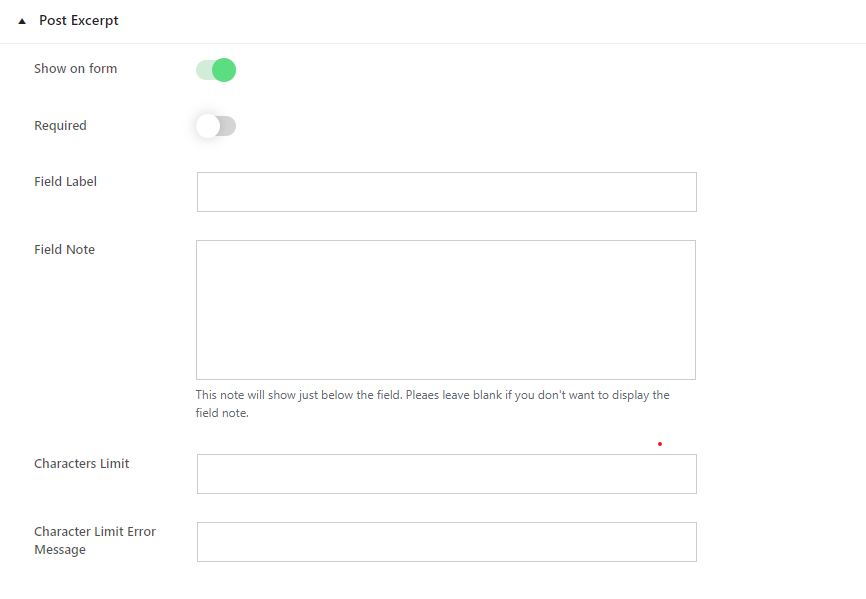
To customize the “Post Excerpt” field, follow these steps:
- Show on Form: Toggle this option to decide whether to display the “Post Excerpt” field on the form. Enable it if you want the field to appear, or disable it if you don’t need it.
- Required: Choose whether the “Post Excerpt” field must be filled out by users before they can submit the form. Toggle this option based on your requirements.
- Field Label: Enter the label text for the “Post Excerpt” field. This text will be visible to users on the form.
- Field Note: If you want to provide additional instructions or information about the “Post Excerpt” field, enter it here. Leave this field blank if you don’t want to display any notes.
- Character Limit: If necessary, specify a character limit for the “Post Excerpt” field. Users will be restricted to this limit when entering text.
- Character Limit Error Message: Enter the message that will be displayed if users exceed the specified character limit for the “Post Excerpt”.
After customizing these options, save your changes to apply the settings to the “Post Excerpt” field. This ensures that the field behaves according to your preferences and requirements.
Author Name and Email
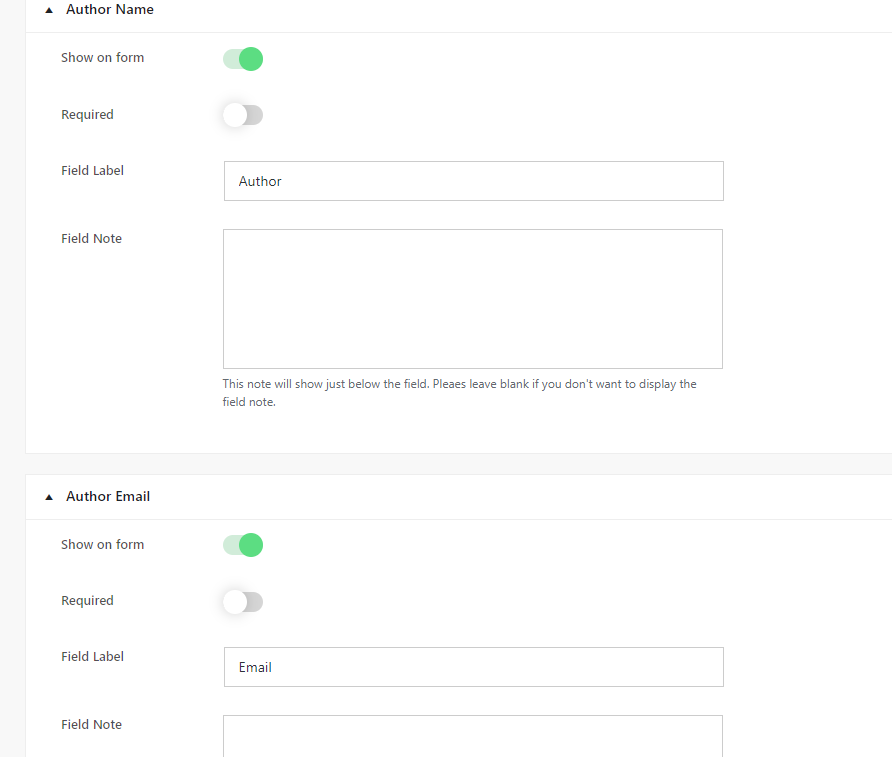
To configure the “Author Name and Email” fields, follow these steps:
- Show on Form: Toggle this option to determine whether the “Author Name” and “Author Email” fields will be displayed on the form. Enable it if you want the field to appear, or disable it if you don’t need it.
- Required: Determine if completing the field is compulsory for submitting the form. Adjust this setting as needed.
- Field Label: Enter the label text for the field. This text will be visible to users on the form.
- Field Note: If you want to provide additional instructions or information about the “Author Name” and “Author Email” fields, enter it here. If not needed, leave this field blank.
After configuring these settings, save your changes to apply them to the “Author Name” and “Author Email” fields. This ensures that the field behaves according to your preferences and requirements.
Categories
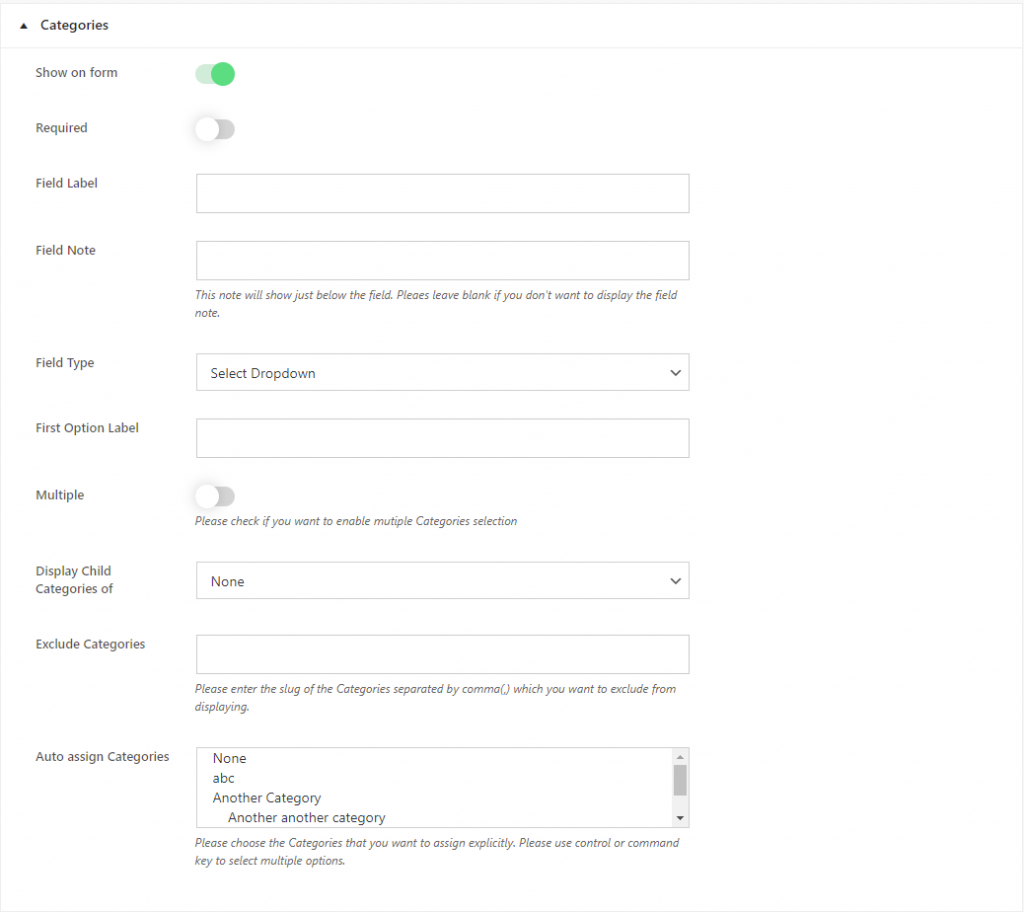
To configure the “Post Categories” field, follow these steps:
- Show on Form: Toggle this option to decide whether the “Post Categories” field will be displayed on the form. Enable it if you want the field to appear, or disable it if you don’t need it.
- Required: Choose whether selecting categories is mandatory for form submission. Toggle this option based on your requirements.
- Field Label: Enter the label text for the “Post Categories” field. This text will be visible to users on the form.
- Field Note: Optionally, provide additional instructions or information about the “Post Categories” field. Leave this field blank if not needed.
- Field Type: Select the type of field input. Choose between “Select Dropdown” and “Checkbox”. Select Dropdown presents categories as a dropdown menu, while Checkbox allows users to select multiple categories by checking boxes.
- First Option Label: If you choose “Select Dropdown” as the field type, customize the label for the first option in the dropdown menu.
- Display Child Categories of: If you want to display child categories of a specific category, select it from the dropdown menu. Choose “None” if no specific category is selected.
- Exclude Categories: Enter the slugs of categories you want to exclude from displaying on the front end, separated by commas.
- Auto Assign Categories: Choose the default categories that will be automatically assigned to the post.
After configuring these settings, save your changes to apply them to the “Post Categories” field. This ensures that the field behaves according to your preferences and requirements.
Tags
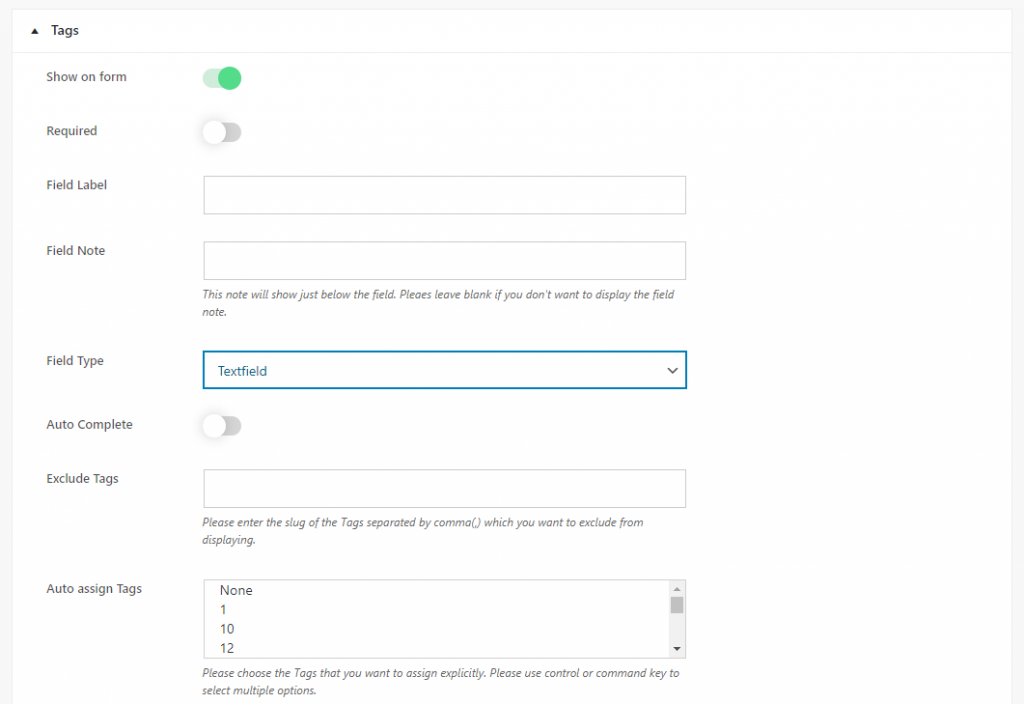
To customize the “Post Tags” field, follow these steps:
1) Show on Form -> Toggle this option to decide whether the “Post Tags” field will be displayed on the form. Enable it if you want the field to appear, or disable it if you don’t need it.
2) Required – Choose whether entering tags is mandatory for form submission. Toggle this option based on your requirements.
3) Field Label – Enter the label text for the “Post Tags” field. This text will be visible to users on the form.
4) Field Note – Optionally, provide additional instructions or information about the “Post Tags” field. Leave this field blank if not needed.
5) Field Type – Select the type of field input. Choose between “Select Dropdown”, “Checkbox”, and “Textfield”.
- “Select Dropdown” presents tags as a dropdown menu.
- “Checkbox” allows users to select multiple tags by checking boxes.
- “Textfield” lets users manually enter tags.
6) First Option Label: If you choose “Select Dropdown” as the field type, customize the label for the first option in the dropdown menu.
7) AutoComplete: Enable this option if you want the field to provide auto-complete suggestions based on existing tags. Users can choose from existing tags or enter new ones.
8) Auto Assign Tags: Choose the default tags that will be automatically assigned to the post.
After configuring these settings, save your changes to apply them to the “Post Tags” field. This ensures that the field behaves according to your preferences and requirements.
Custom Fields Settings
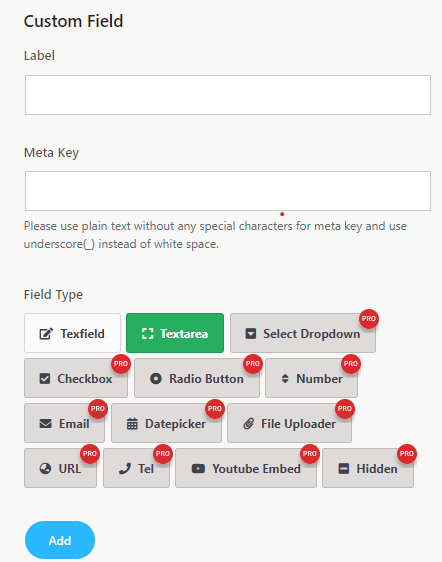
To create a custom field, follow these steps:
- Label: Enter the label for the custom field. This label will be displayed on the form, indicating what type of information should be entered.
- Meta Key: Define the meta key for the custom field. Use plain text without any special characters, and replace white spaces with underscores (_). The meta key is used to store the custom field’s data.
- Field Type: Choose the desired field type for your custom field. Below are the available field types:
In Lite Version
- TextField: Allows users to input a single line of text.
- Textarea: Provides users with a larger area to input multiple lines of text.
If you’d like to access additional field types beyond the Textfield and Textarea options, you’ll need to upgrade to the Pro version of the Frontend Post Submission Manager Plugin.
This upgrade will unlock features such as Select Dropdown, Checkbox, Radio Button, Number, Email, Datepicker, File Uploader, URL, Tel, Youtube Embed, and Hidden field types, providing you with more versatility in creating custom forms tailored to your needs.
These additional field types in the Pro version offer greater flexibility in collecting various types of data from users, enhancing the functionality and customization options of your forms.
Choose the appropriate field type based on the information you want to collect from users.
By following these steps, you can easily set up guest posting form on your WordPress website using the Frontend Post Submission Manager plugin lite, allowing contributors to submit content directly to your site and expanding its reach and engagement.
Next, we’ll navigate to the layout settings to choose Form templates and custom fields Display Templates.
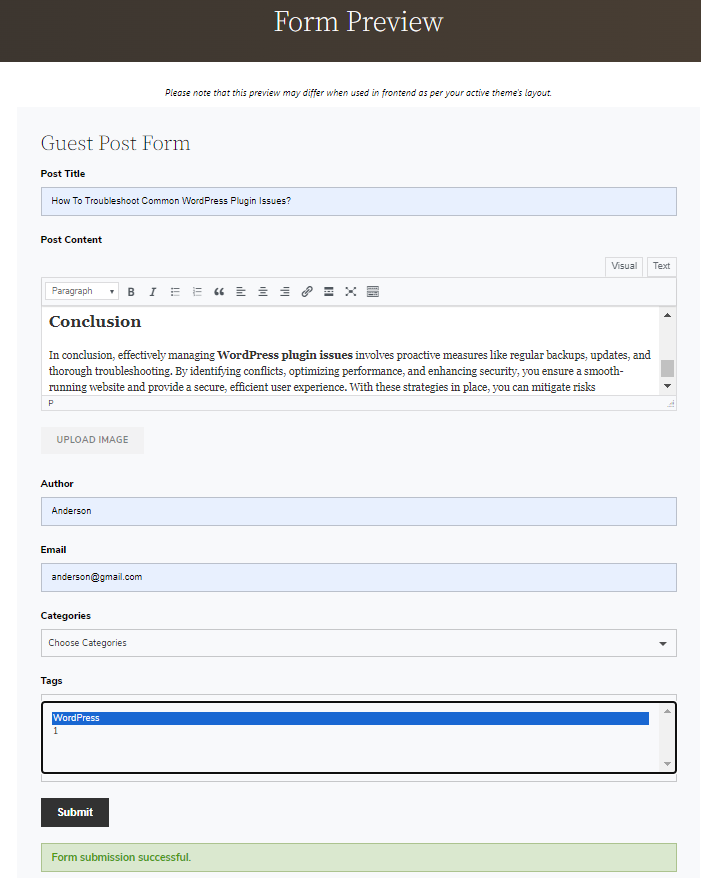
Preview
After submitting the guest post, it will be available in the add new post.

Step 6: Layout Setting
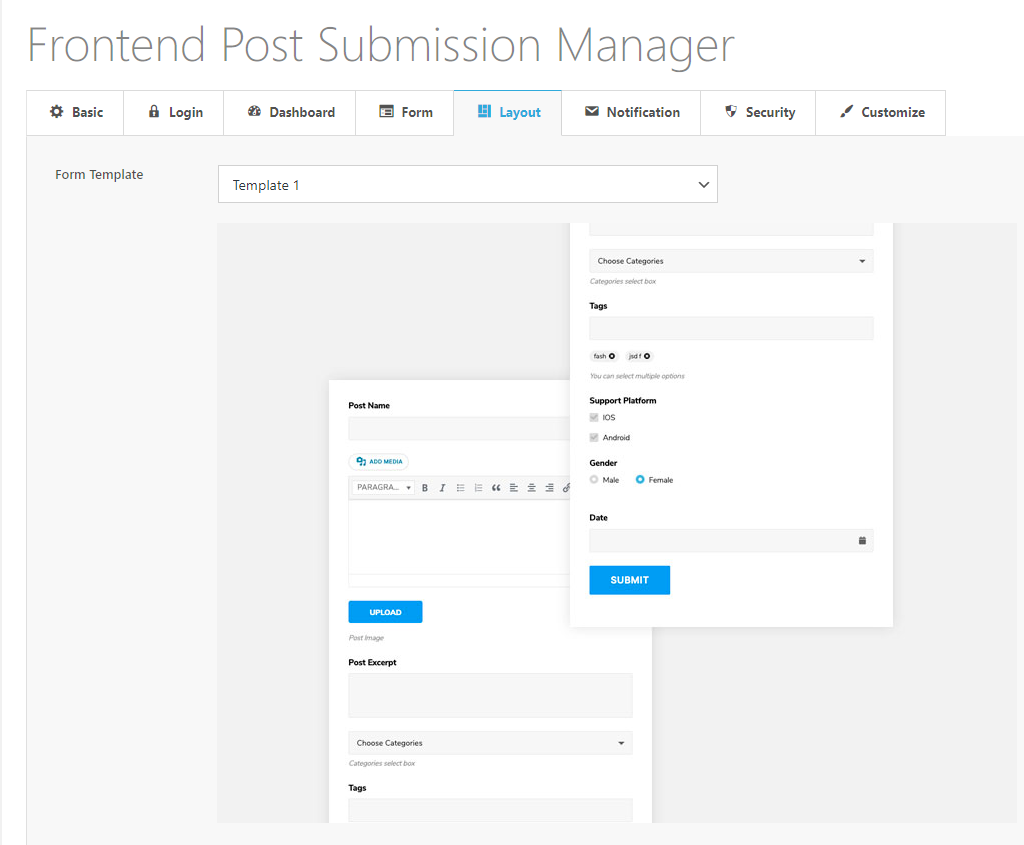
In the layout settings, you have the option to customize the appearance of your guest posting form:
- Choose Template: Select a template from our 5 pre-designed template options to determine the overall layout and styling of your form. This helps ensure your form matches your website’s design aesthetic and functionality needs.
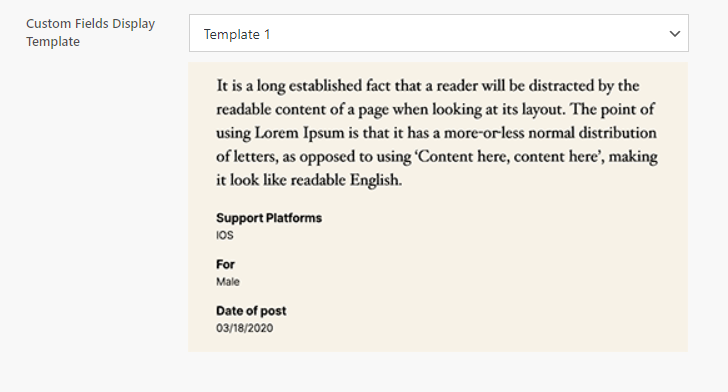
- Custom Fields Frontend Display Styles: For any custom fields added to the form and chosen to display on the front end, you can customize their appearance. This allows you to tailor the visual presentation of custom fields to match the overall design of your form and website.
Now, moving forward to Notification Settings.
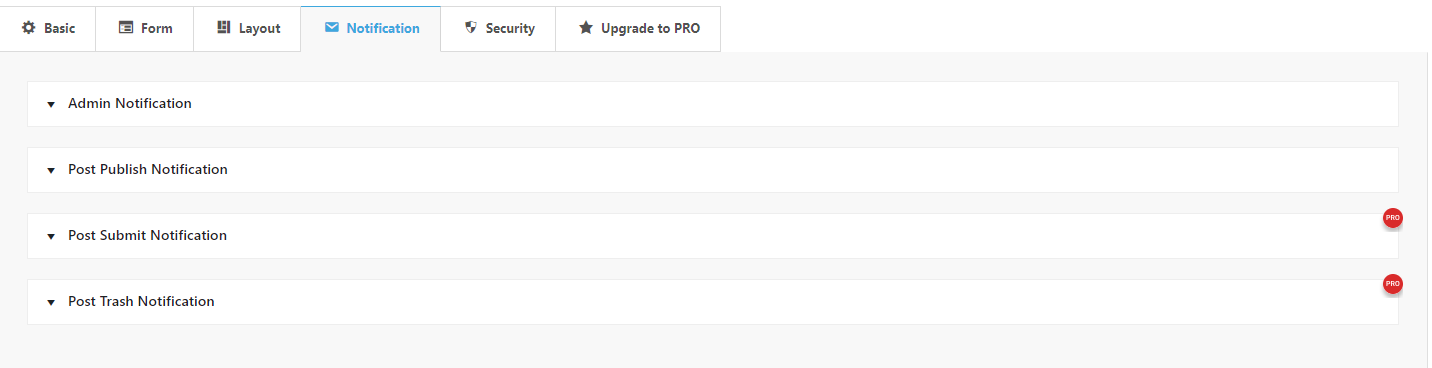
Step 7: Notification Settings
To configure notification settings for frontend post submission, follow these steps:
Admin Notification:

- Enable: Toggle this option to enable or disable admin notifications. When enabled, notifications will be sent to specified email addresses.
- Notification Emails: Enter the email addresses, separated by commas, where you want to receive admin notifications. If left blank, notifications will be sent to the email address of the site admin configured in your site’s general settings.
- Subject: Enter the subject for the admin notification email.
- From Name: Enter the name that will appear as the sender in the admin notification email. Avoid using real names to prevent emails from being marked as spam.
- From Email: Enter the email address that will appear as the sender in the admin notification email. Use an email address that does not resemble a real person’s email to avoid spam filters.
- Message: Enter the message content that you will receive in the admin notification email. You can use placeholders like [post_title] and [post_admin_link] to dynamically insert the submitted post title and post admin link in the email message.
Post Publish Notification:
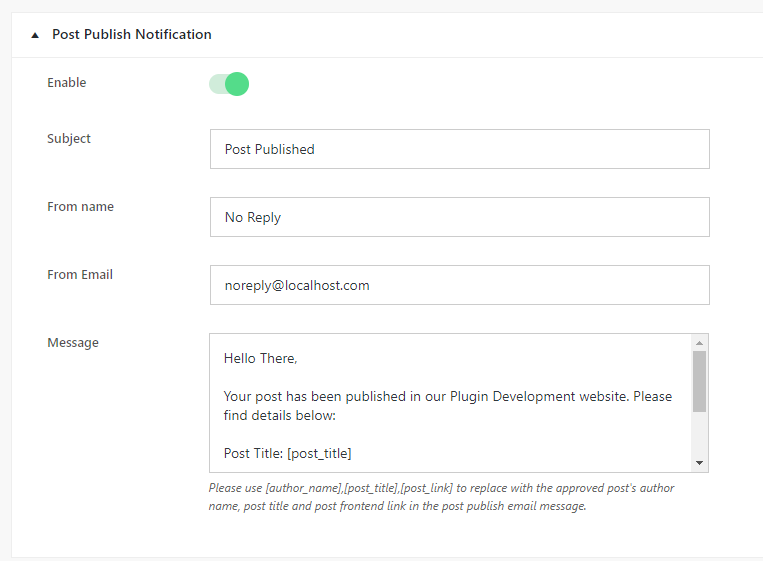
- Enable: Toggle this option to enable or disable post-publish notifications. When enabled, notifications will be sent when posts are published.
- Subject: Enter the subject for the post-publish notification email.
- From Name: Enter the name that will appear as the sender in the post-publish notification email. Use a generic name like “No Reply” to avoid spam filters.
- From Email: Enter the email address that will appear as the sender in the post-publish notification email. Use an email address that does not resemble a real person’s email to avoid spam filters.
- Message: Enter the message content that you will receive in the post-publish notification email. You can use placeholders like [author_name], [post_title], and [post_link] to dynamically insert the submitted author name, post title, and post link in the email message.
To access the Post Submit Notification and Post Trash Notification settings, you’ll need to upgrade to the Pro version of the Frontend Post Submission Manager Plugin. With the Pro version, you’ll unlock these features, allowing you to configure notifications related to post submissions and trashing actions, keeping you informed about activity on your site.
Configure these settings to ensure you receive notifications related to frontend post submissions and post publishing.
Step 8: Security Settings
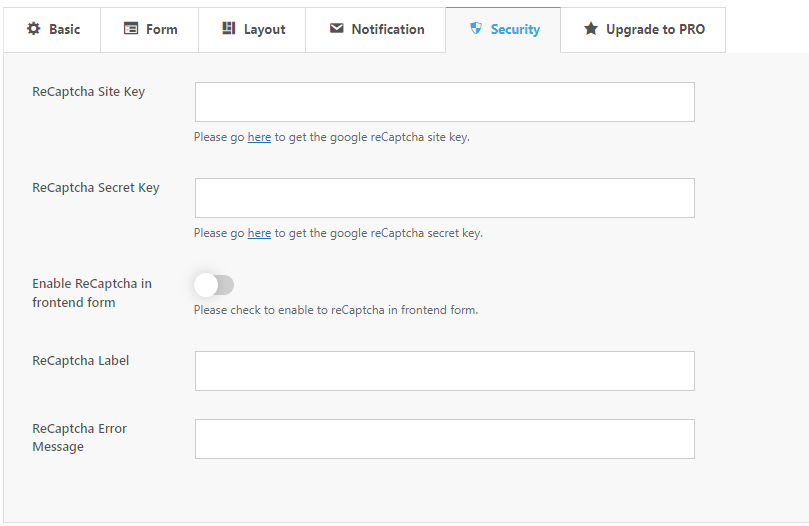
To set up Google reCAPTCHA for your guest form, follow these steps:
- ReCaptcha Site Key: Obtain your reCAPTCHA site key from the specified link. This key is required for integrating reCAPTCHA with your form.
- ReCaptcha Secret Key: Similarly, obtain your reCAPTCHA secret key from the provided link. This key is also necessary for the integration process.
- Enable ReCaptcha in Frontend Form: Check this option to activate reCAPTCHA on your form’s front end. This adds an extra layer of security by verifying that users are not bots before submitting the form.
- ReCaptcha Label: Customize the label text for the reCAPTCHA field that appears on your form. This label informs users about the reCAPTCHA verification process.
- ReCaptcha Error Message: Define the error message that will be displayed if the reCAPTCHA verification fails. This message informs users about any issues encountered during the verification process.
By configuring these settings, you can effectively integrate reCAPTCHA with your form, enhancing its security and minimizing spam submissions.
Step 9: Using the Shortcode

To utilize the shortcodes generated by the plugin, follow these instructions:
- The frontend dashboard shortcode [fpsm_dashboard alias=”alias_of_your_form”] is generated for forms that allow guest submissions.
- This shortcode displays the frontend dashboard where users can manage their submitted posts.
- Similarly, replace “alias_of_your_form” with the alias of your specific form.
By inserting these shortcodes into your WordPress pages or posts, you can easily integrate the form and frontend dashboard functionality into your website.
By following these steps, you should be able to set up guest posting by using the Frontend Post Submission Manager lite plugin seamlessly into your WordPress site.
Conclusion
In conclusion, by utilizing the Frontend Post Submission Manager Lite plugin, enabling or allowing guest posting for your WordPress website becomes a straightforward process. This powerful tool streamlines submission management, enhances user engagement and enriches your site with diverse content. With features like customizable forms, secure submissions, and notification settings, you can effectively collaborate with guest contributors while maintaining control over your content. Embracing guest posting not only expands your reach but also establishes your authority within your niche community. So, take advantage of this opportunity to foster collaboration, drive traffic, and elevate your WordPress website to new heights.
So, why wait? Install the Frontend Post Submission Manager Lite plugin today and start accepting guest contributions to take your WordPress website to the next level.