If you’re looking to provide a platform for anonymous guest posting on your WordPress website,
we have a Frontend Post Submission Manager plugin to submit and manage anonymous posts from the front end with or without logging in.
With Frontend Post Submission Manager, users can easily create and submit posts, whether they’re logged in or not. This powerful yet user-friendly plugin streamlines the entire process, enhancing user engagement and driving up content generation on your site.
In this guide, we’ll walk you through the steps to set up anonymous guest posting on your WordPress site, ensuring both freedom of speech and responsible content management.
From plugin selection to moderation strategies, we’ll cover everything you need to know to establish a safe and inclusive environment for anonymous contributors.
Let’s get started by understanding the importance of anonymous guest posting.
Table of Contents
Understanding the importance of Anonymous Guest Posting
Anonymous guest posting plays a crucial role in fostering open communication and inclusivity on your WordPress website. Allowing anonymous guest posting on your WordPress website can significantly enhance the dynamics of your online community. This anonymity can encourage hesitant individuals to participate, leading to a more vibrant and engaged online community. Moreover, it provides a platform for discussing controversial or personal subjects without fear of judgment or repercussions, ultimately enriching the depth and breadth of discussions on your site.
How To Set Up Anonymous Guest Posting On Your WordPress Website?
In this guide, we’ll walk you through the steps to set up anonymous guest posting on your WordPress site using the Frontend Post Submission Manager Plugin, ensuring both freedom of speech and responsible moderation.
Install and Activate the Plugin
First of all, you need to go to your WordPress Dashboard and then find the plugin section and click on it.
After that, you can see an add new plugin at the top left corner and click on it to add a new plugin.
Now search for the “Frontend Post Submission Manager” plugin and install it.
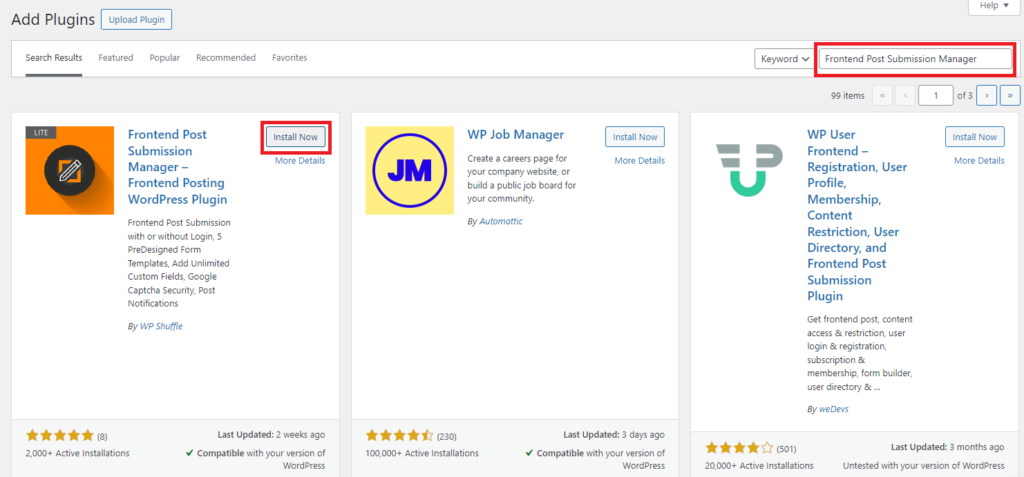
After that activate the plugin.
Once you’ve installed and activated the plugin, configure a form to allow guests to post anonymously. You can customize settings such as post status, validation messages, and required fields to meet your needs.
Accessing the plugin
Now, you can see the Frontend Post Submission Manager plugin appear on your WordPress Dashboard then move a cursor on it, and click on All Forms.
After clicking on All Forms, you can see two available form lists i.e. Guest and Login Require Form.

Configuring a Form
To configure a form, you can simply click on the guest form or you can click on the edit button on the form list.
After clicking on it, you can see different available settings on the screen i.e. Basic, Form, Layout, Notification, and Security.
Many settings are available but we will use a few settings only according to the requirements to enable the anonymous guest posting form.
For setting up all the settings -> How To Set Up Guest Posting For Your WordPress Website?
Now moving forward to the basic setting.
Basic Setting
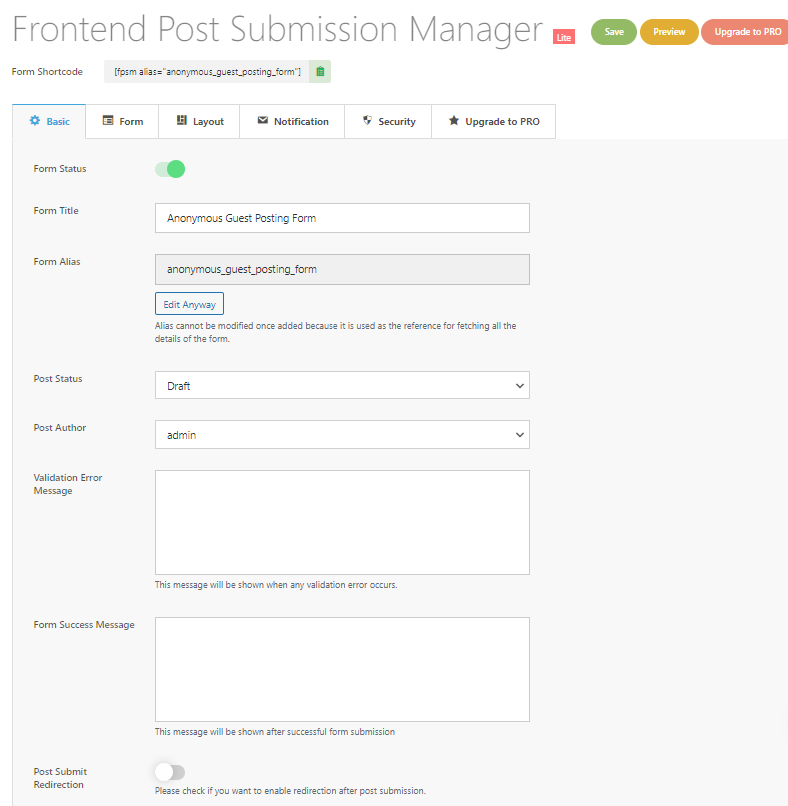
In Basic Setting, you can see the Form status which was disabled so enable the form status and then set the title of the form which will appear in frontend.
By default, the post status was set to pending review. You can configure the status of the submitted post, such as Publish, Draft, or Pending, based on your requirements.
After that enter the validation error message to display whenever the error occurs which helps the user to guide the corrections.
Then enter the form success message to display whenever the form is submitted successfully. It confirms to users that their submission was successful.
Now, heading towards the form setting.
Form Setting
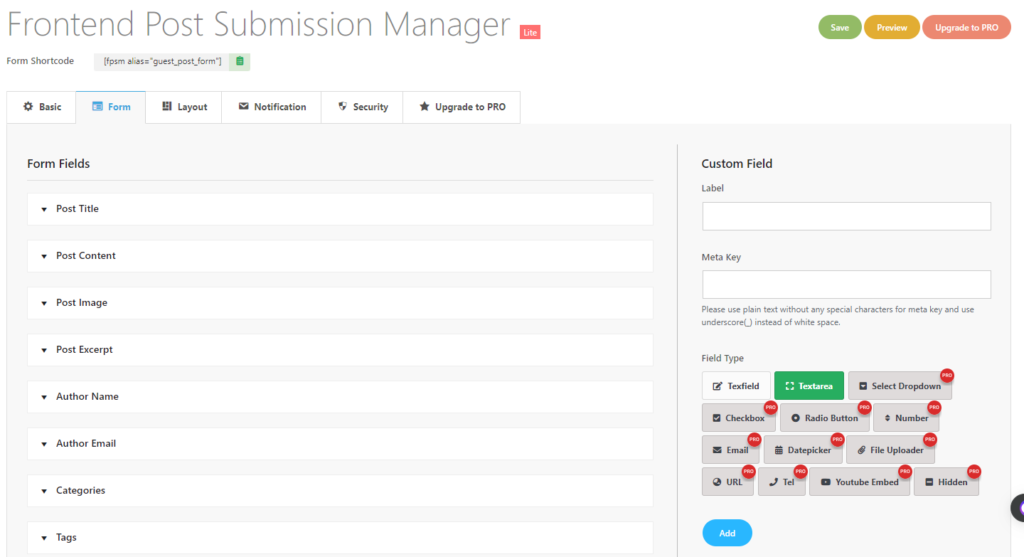
As you can see in the form setting, many form fields are available and to enable or set up anonymous guest posting, we will make a form with only a few important fields that are needed.
Post Title
At first, you can see a Post Title field, here we will open this field and enable the show on form and required option so the title of the post will appear in the form.

Then enter the error required message to display on the form when the field label of the title is empty.
Add the field note and you can set the character limit for the post title and make a character limit error message so that the user can write according to the limit.
Post Content
Now it’s time to set up a post-content field. In post content, we can choose the available Editor type i.e. Simple Textarea, Rich Text Editor, Visual Text Editor, and HTML Text Editor.
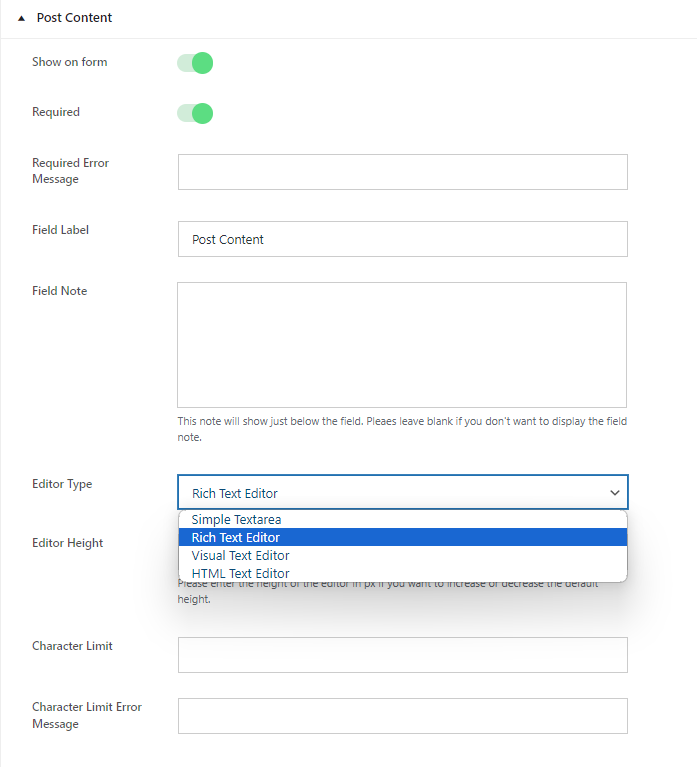
When selecting a text editor, consider your preference for simplicity or complexity.
A basic textarea offers straightforward functionality, while a rich text editor provides both HTML and visual versions with editing tools.
Opt for a visual text editor if you prefer a WYSIWYG interface without HTML options, and choose an HTML text editor if you prefer working solely with HTML, devoid of visual elements.
Each option caters to different editing needs and preferences.
Optionally, set a character limit for post content.
Save changes after configuring settings.
Post Image

Toggle “Show on Form” to display or hide the “Post Image” field as needed.
Choose if it’s required or optional. Define the “Field Label” for clarity. Add instructions or notes in “Field Note” for users.
Customize the “Upload Button Label” to prompt image uploads.
Optionally, set a file size limit with “Upload File Size Limit” and specify the error message for exceeding this limit with “Max Size Error Message”.
Now after setting up the post title and post content field, open the “Author Name and Author Email” fields.
Author Name and Author Email
To enable or set up anonymous guest posting on your WordPress website, you’ll need to adjust the settings to allow submissions without requiring users to provide their name and email.
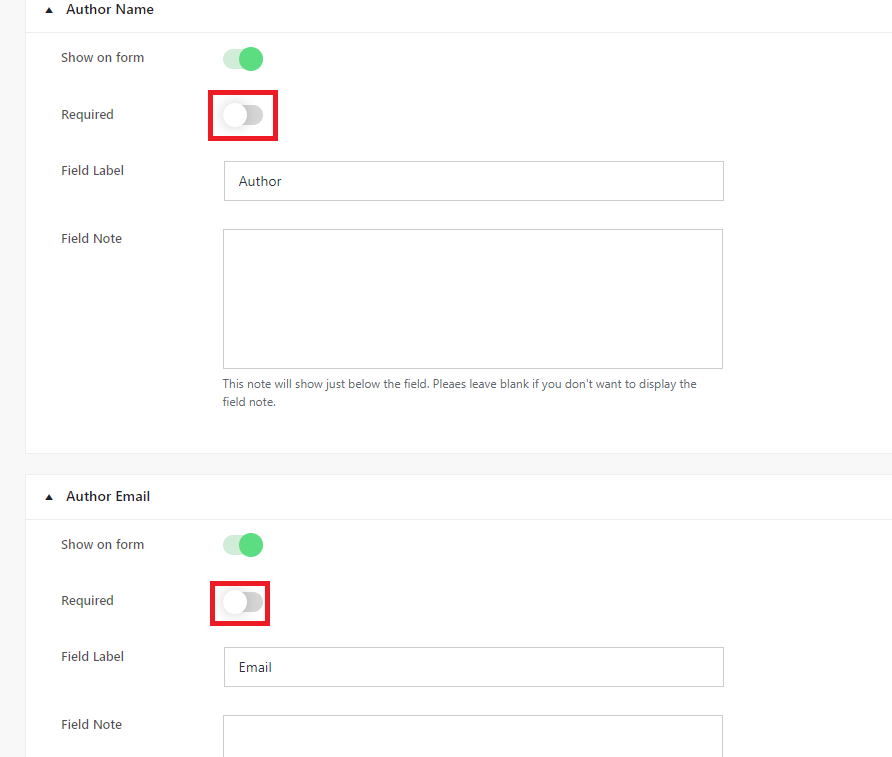
This essentially means disabling the required fields for “Author Name” and “Author Email.” By doing so, users can submit posts anonymously without needing to disclose personal information.
After setting up the form settings, click on save.
Using the Shortcodes

Now, copy the shortcodes from the above.
Go to pages and click on add new pages.
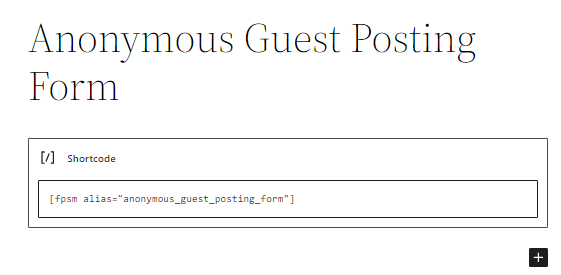
Then paste the shortcode and publish it.
Preview of the form
This is how the Anonymous Guest Posting form looks like after publishing it.
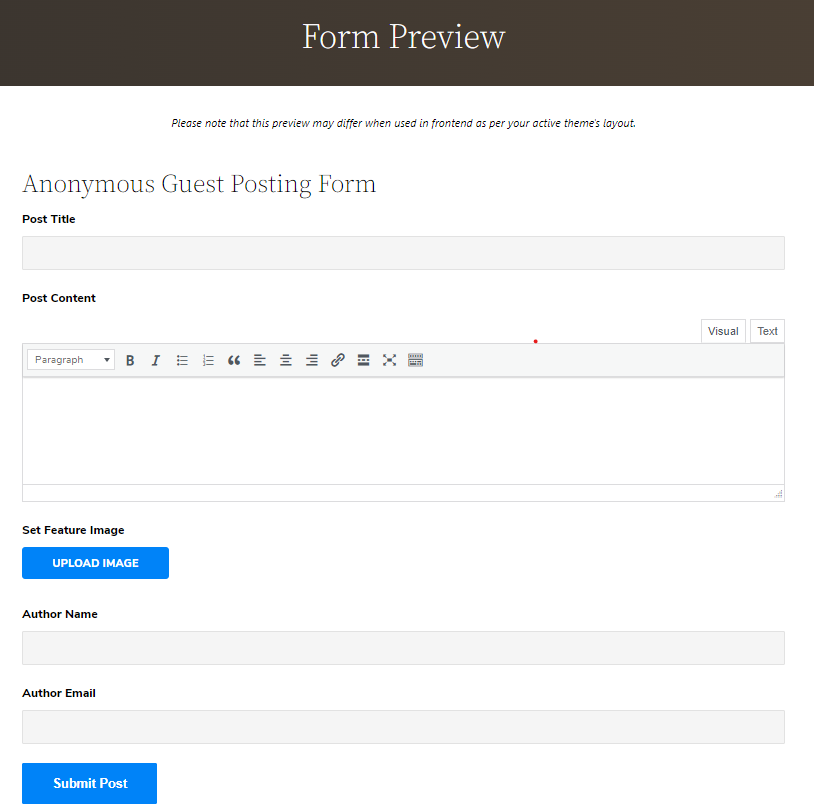
When an anonymous user fills up the form and submits the post. This is how the form will look like.
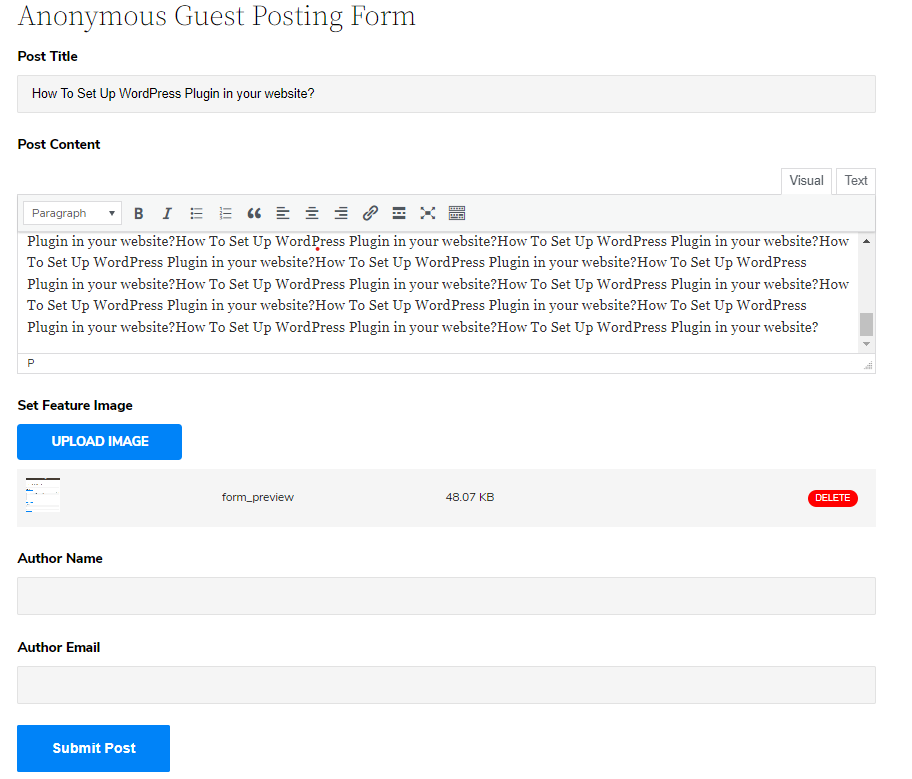

Now go to the dashboard and click on the post, there you can see the post was in draft.

Now click on it and then you can see the frontend post submission manager where the author name and email are empty.

By following these steps, you should be able to set up anonymous guest posting by using the Frontend Post Submission Manager lite plugin seamlessly into your WordPress site.
Conclusion
Setting up anonymous guest posting on your WordPress website can greatly enhance the inclusivity and diversity of your online community, fostering open dialogue while protecting user privacy. By utilizing the Frontend Post Submission Manager plugin, you can create a seamless experience for anonymous contributors while maintaining control over content moderation.
Throughout this guide, we’ve outlined the importance of anonymous guest posting in facilitating authentic expression and meaningful discussions. We’ve also provided step-by-step instructions on installing and configuring the plugin to enable anonymous submissions.
By following these instructions, you can establish a safe and inclusive environment where users feel empowered to share their thoughts and perspectives without fear of judgment or repercussion. Remember to implement moderation strategies to ensure responsible content management and safeguard against abuse.
With careful consideration and the right tools in place, you can create a vibrant and engaged online community where diverse voices are valued and respected.

