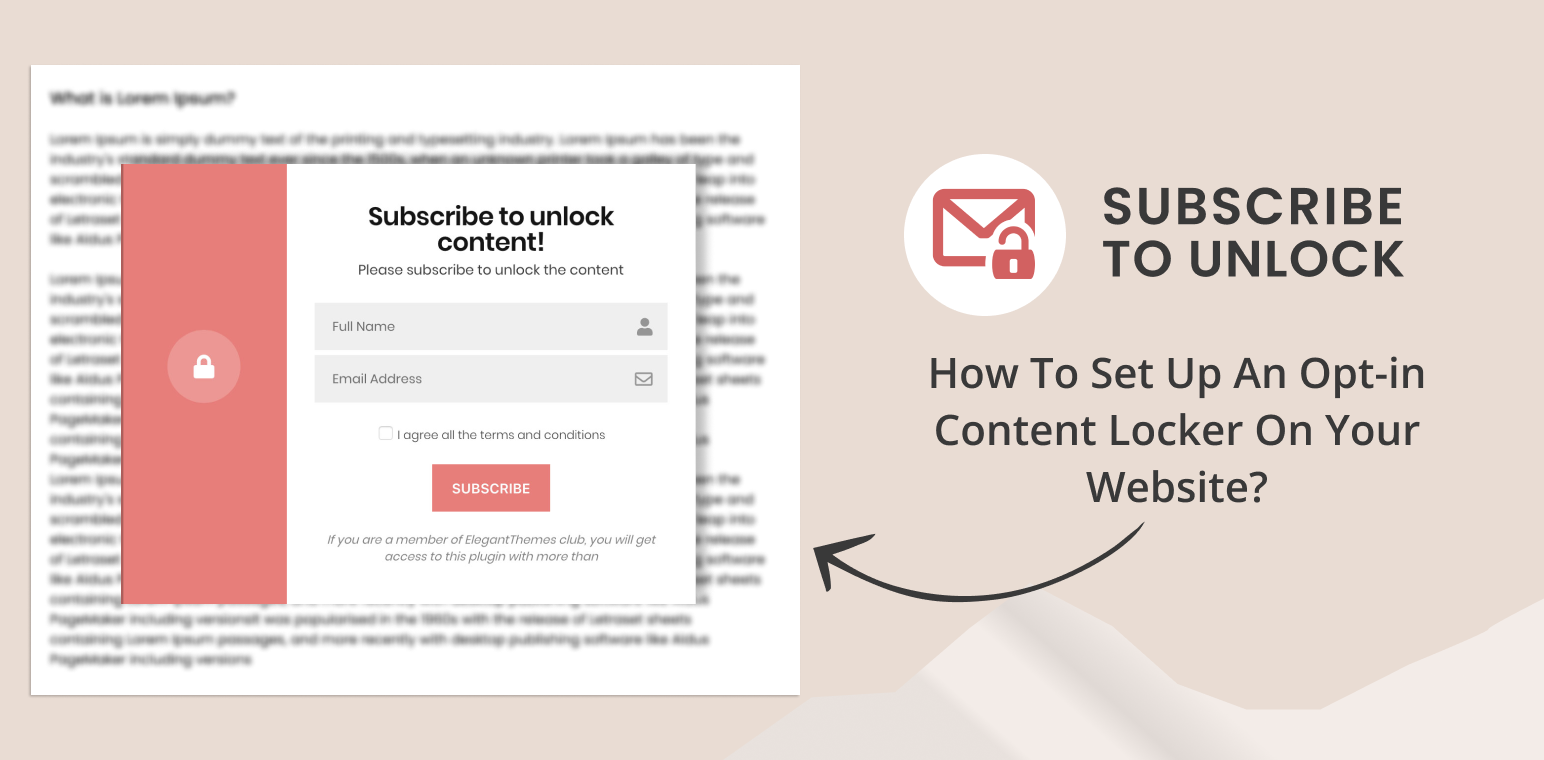
Do you want to increase your website’s engagement and grow your email list effortlessly?
An opt-in content locker might be the perfect solution for you. By restricting access to valuable content until visitors subscribe or perform a specific action, you can entice users to join your mailing list, boosting your lead generation efforts.
In this guide, we’ll show you how to set up an opt-in content locker on your website using subscribe to unlock lite plugin, step-by-step, so you can start reaping the benefits of this powerful marketing strategy.
Understanding the Subscribe to Unlock Lite plugins
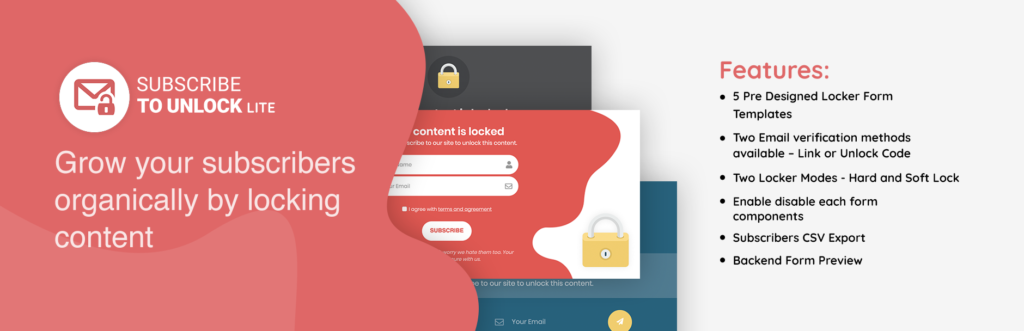
Subscribe to Unlock Opt-In Content Locker Lite is a free tool designed to effortlessly capture subscribers on your WordPress site. It works by locking specific content until users subscribe. You can verify subscribers using either link verification or unlock code verification.
You can configure form, choose a stunning layout from our 2 beautifully pre-designed templates, export subscribers, and whatnot. With this plugin, you are just a few seconds away from collecting the subscribers from your WordPress site because integrating a subscription form in any site is that easy with our plugin.
Features
- 5 Pre Designed Subscription Form Templates
- Two Locker Modes – Hard and Soft Lock
- Two Email verification methods are available – Link or Unlock Code
- Enable disable each form components
- Ajax Form Submission
- Subscribers CSV Export
- Backend Form Preview
- Enable/disable form components
- All device-friendly and browser-compatibility
- Dedicated Support
- Translation Ready
How To Set Up an Opt-in Content Locker On Your Website?
To set up an opt-in content locker on your website using Subscribe to unlock lite plugin, we need to install the plugin. So, here we are providing a few steps to set up this plugin:
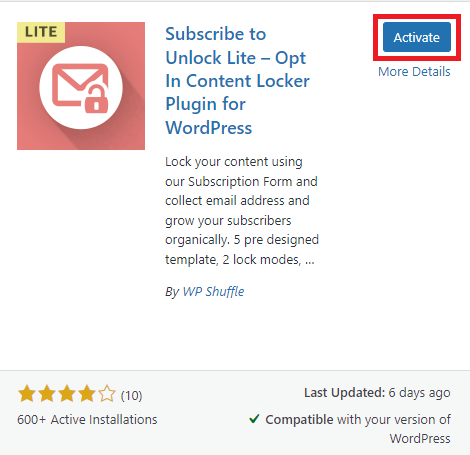
Step 1: Install the Subscribe to Unlock Lite Plugin
- First log into your dashboard.
- After that move the cursor on the plugin and click on add new plugin.
- Then search for a plugin named “Subscribe to unlock Lite”
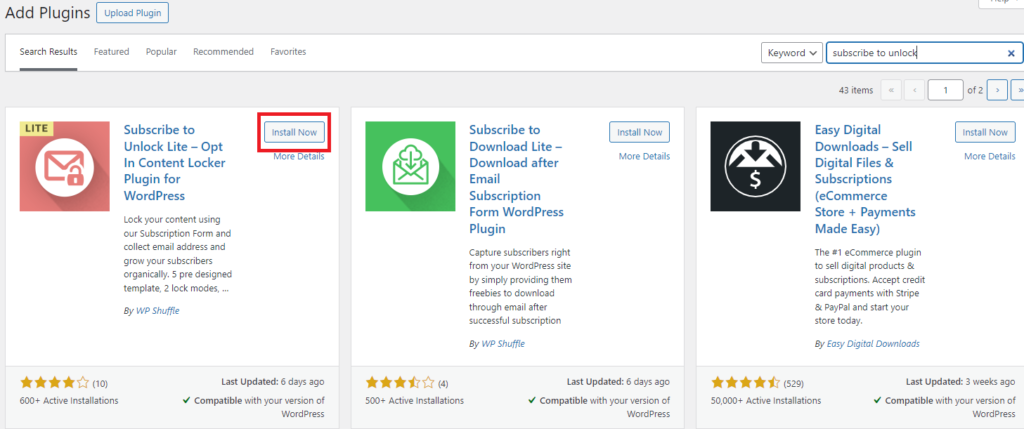
- Now, click on install, and after a few seconds activate the plugin.
Step 2: Configure The Plugin Settings
After installing and activating the plugin, at the left side of the WP Dashboard, you will find a Subscribe to Unlock lite plugin.
Now, here you can click on that plugin or settings, and it will land on the settings page of the plugin.
In this section, you can configure 4 settings i.e. General, Form, Layout, and Email Settings.
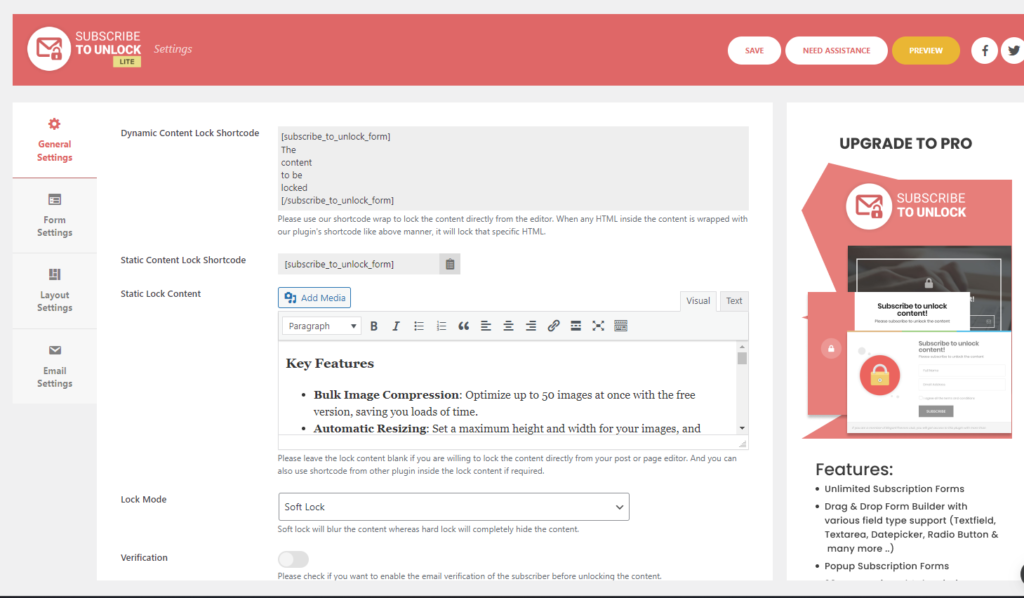
General Settings
Here you can see many form fields and options are available in general settings.
According to your requirements, you can choose and select the available option for your website.
Here’s a breakdown of the individual options available in the general settings of the Subscribe to Unlock Opt-In Content Locker Lite plugin:
1. Lock Content: Enter the content that you want to display after a successful user subscription. This field is optional, as content can also be locked directly within your page or post editor using the built-in lock button.
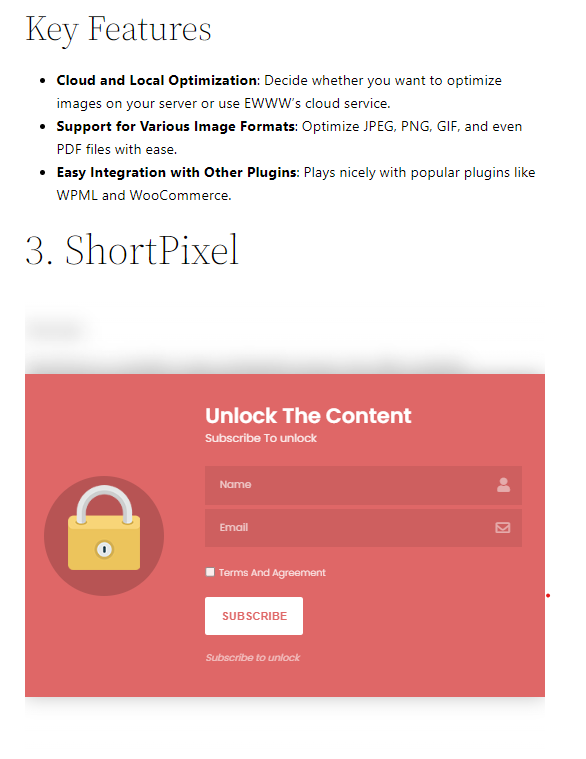
2. Lock Modes: Choose between two lock modes:
- Hard Lock: Completely hides the locked content.
- Soft Lock: Partially hides the content by blurring it, allowing users to preview it before subscription.
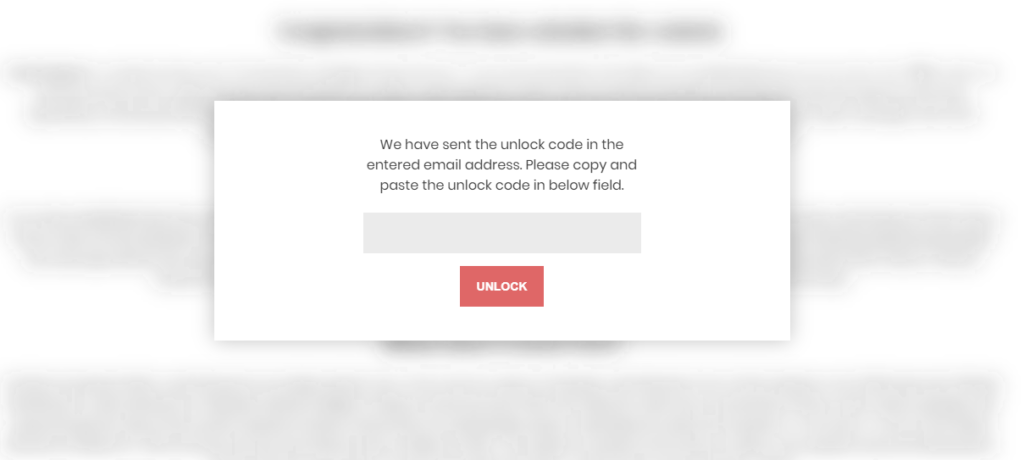
3. Subscriber Verification:
- Link Verification: After a visitor subscribes, they receive an email with a verification link. Clicking this link verifies their subscription and unlocks the content.
- Unlock Code Verification: Alternatively, subscribers receive an email with a unique unlock code that they must enter on your site to access the locked content.
4. Form Success Message: Customize the message displayed to users upon successful subscription.
5. Form Required Error Message: Customize the message shown to users if they fail to fill in all the necessary required fields in the subscription form.
6. Form Error Message: Customize the message shown to users if an error occurs while sending the email, such as an invalid email address or server-related issues.
These settings provide flexibility and control over how content is locked, verified, and displayed to users, ensuring a smooth and user-friendly subscription experience on your WordPress site.
Form Settings
Here, in form settings, you can see different form field lists.
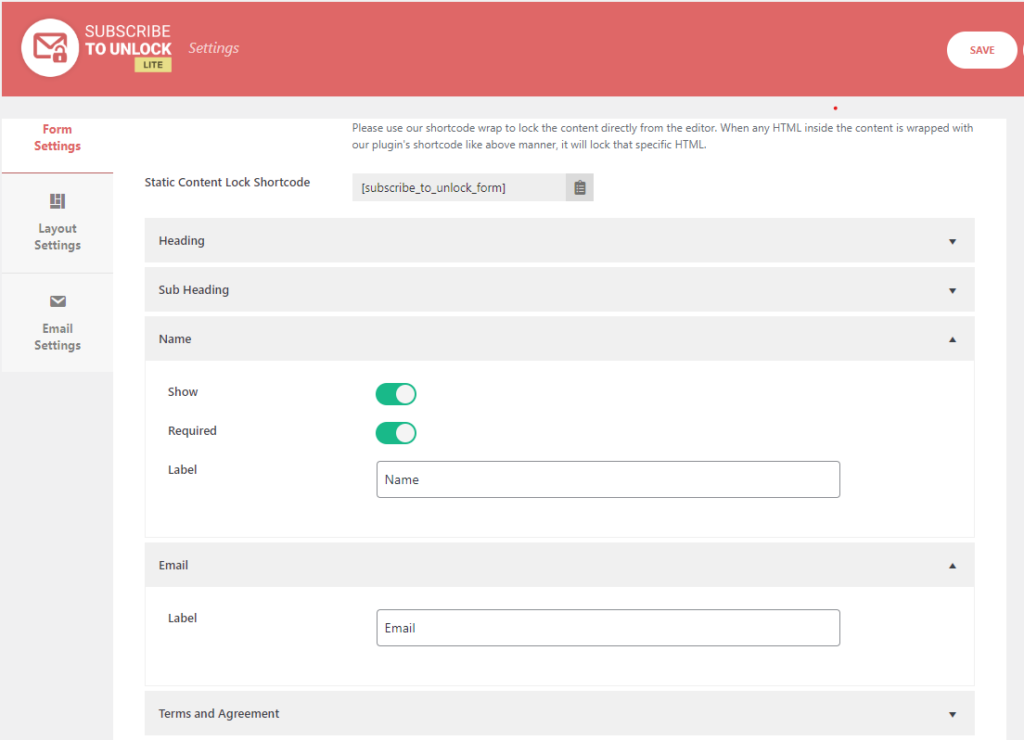
As you can see in the above picture, many form field lists are available:
- Heading
- Sub Heading
- Name
- Terms and Agreement
- Subscribe Button
- Footer Text
Now make a form with available fields to lock your content.
Layout Settings
In this section, you can configure essential settings related to the layout of the subscription form. You can choose from one of the five beautiful pre-designed templates available in this lite version.
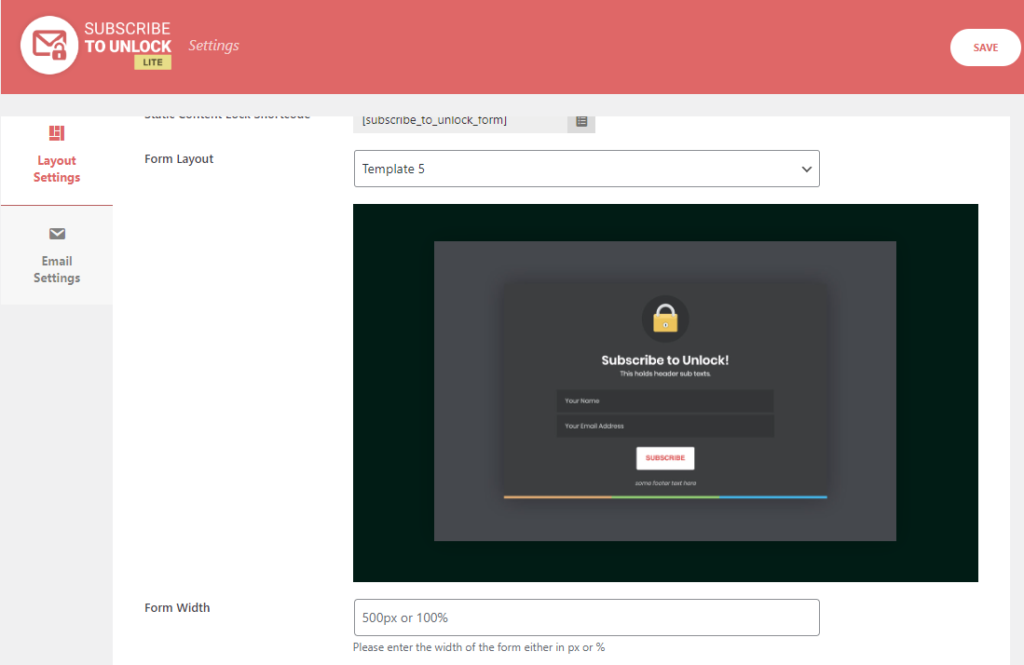
Here are two available Options:
Form Layout: This option includes a dropdown menu with all the available pre-designed templates. You can select one from the five templates currently available. Each template offers a unique design and layout. You can preview and select the template that best fits your website’s style.
Form Width: Customize the width of the subscription form to match your website’s design. Although each template comes with a default width, you can adjust it according to your preferences. Enter your desired width in pixels (px) or as a percentage (%) to ensure the form integrates seamlessly with your site.
Email Settings
In this section, you can configure all the necessary email-related settings, such as the sender’s name and email address. This ensures that all communications sent to your subscribers are properly branded and professional.
Here are the available Options:
- From Name: Set the name that will appear in the ‘From’ field in the emails sent to subscribers. This should be your name or your business/website name to ensure subscribers recognize who the email is from.
- From Email: Set the email address that will appear in the ‘From’ field in the emails sent to subscribers. This should be a legitimate email address associated with your domain to maintain professionalism and trust.
- Email Subject: Enter the subject of the email sent for subscriber verification. This subject should clearly indicate the purpose of the email, such as “Please Verify Your Subscription” or “Confirm Your Email to Unlock Content”.
- Email Message: Configure the message content that will be sent to subscribers for verification. The message should provide clear instructions on how to verify their email address, whether through clicking a verification link or entering a provided unlock code. Personalizing this message to reflect your brand’s voice and tone can enhance the user experience.
These settings allow you to personalize the layout and branding of your subscription forms and email communications, ensuring a cohesive and professional experience for your subscribers.
Step 3: Locking content using shortcodes
You can add the lock content directly in the subscription form’s general settings when creating a form and then insert the shortcode anywhere within the page or post’s content editor.
Alternatively,
You can lock any content by simply wrapping it with our plugin’s shortcode inside the classic editor block, as shown below:
[subscribe_to_unlock]
Content
To
Be Locked
Here
[/subscribe_to_unlock]
Preview
This is how it looks like in the preview when we lock the content using shortcodes.
Now heading towards the subscriber list.
Step 4: Subscriber List
In this section, you can view all the subscribers who have subscribed through various subscription forms. You can also filter subscribers based on different forms and export the subscriber list to a CSV file for further external use.

Conclusion
In conclusion, the Subscribe to Unlock Lite plugin offers a straightforward way to set up an opt-in content locker on your website, boosting user engagement and email list growth effortlessly. With features like pre-designed templates, customizable settings, and easy shortcode implementation, you can quickly incentivize visitors to subscribe, driving lead generation efforts effectively.
With the Subscribe to Unlock Lite plugin, you have the tools to implement this powerful marketing strategy effortlessly. Start unlocking your website’s full potential today for meaningful business results.