How to install WordPress Plugin?

Want to build a WordPress website for your business or portfolio? You need to select a powerful plugin that is integrated with attractive features. There are various methods to install WordPress Plugin.

There are thousands of plugins available in the WordPress directory. You can go through the list and get the one as per your requirement. If you are a beginner, you can try the free one. And for an advanced upgrade to the premium plugins

WordPress plugins are the most essential elements for customizing your website. They allow you to add new features to WordPress like a gallery, contact form, templates, slideshow, shopping cart, and more. 

At first, you need to install WordPress and then you can go for the plugin installation process. Here you need to know one thing, if you are using WordPress.com, you cannot install plugins. You need to upgrade to their business plan to use any plugin. But, if you are starting with the WordPress.org website, you are free to install any plugin. 

Since you are about to install a plugin for your WordPress website, you need to know which type of plugin is suitable for you. So you need to look for the following features before you install any plugin:

Features Required for Powerful Plugin

  • Speed the blog
  • Secure the blog
  • Schedule full backups
  • SEO Optimization
  • Manage teams and editorial process
  • Grow the email list

Besides this, you also need to look after the number of downloads, Average rating, Reviews, Support activity, and Developer details. With this, there are great possibilities to get a powerful plugin. 

I am focusing on several features of a plugin because if you select the wrong one, you may have to regret it later. A wrong plugin can cause an error in the site which will slow down your server. Also, your site may be attacked by malicious code. With these all, you may lose your traffic. So, think twice before selecting any plugin.

Well, I think, you are now prepared to choose your plugin. So the question is, how to install the plugin? There are different methods to perform this task. Today in this article, we are going to discuss the 3 best methods. Go through all of these and install your plugin through any of them at your ease. 

So let’s get started:

How to Install WordPress Plugins From the Official Plugins Directory?

One of the easiest methods to install a plugin for your WordPress site is through the official plugins directory. It is mainly for beginners, but anyone can go through this. 

If you have decided to go through the plugin upload method, remember, that paid WordPress plugins cannot be installed through this process. So if you are about to install the premium plugin, go for other methods. Since premium plugins are not listed in the directory, you cannot upload those.

Let’s see how one can install the plugin through the plugin directory:

  • Login to your WordPress dashboard
  • Navigate to Plugins
  • Click on Add New
  • Search for the plugin that you want to install by typing in the Keyword box
  • Once you find the plugin, click on the Install Now button
  • When the installation process is done, press the Activate button
search plugin
activate plugin

With this, you can install your plugin for your upcoming website. Now, let’s check whether the process is completed or not. For this, you need to configure the settings of your installed plugins. For this go through the following few steps:

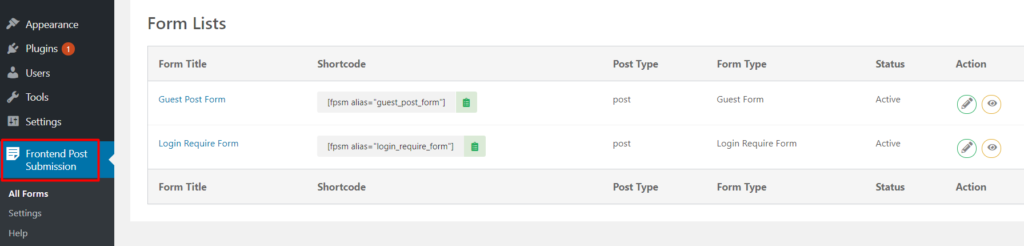
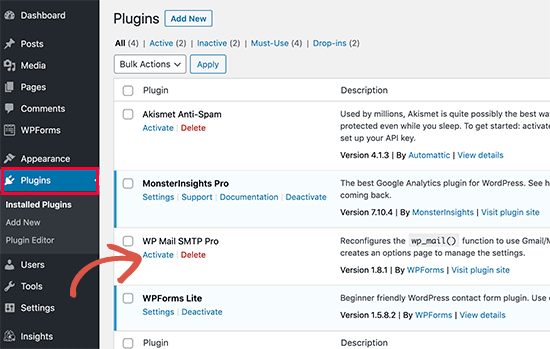
  • Go to the WordPress admin panel
  • Head to Plugins
  • Go to Installed Plugins
  • Search for your installed plugin
  • If the plugin is available there, it means your task is done successfully 

How to install a Plugin using the WordPress Admin Plugin Upload?

The second method to upload a WordPress plugin is through the upload method. Like the above method, it is also easy to go through. Beginners can also use this method and install a plugin for their website. 

As we mentioned, premium plugins cannot be installed from the first one, you can go for the upload method to install the premium plugin for your site.

So, let’s see how to use the upload method to install the WordPress plugin:

  • At first, download the zip file of the plugin from the source 
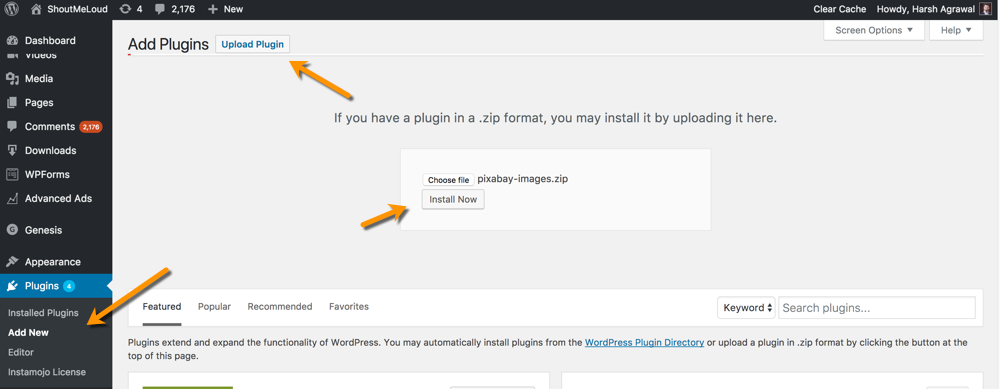
  • Now, go to the WordPress admin area 
  • Visit Plugins section
  • Click on Add New page
  • Go to the top of the page and click on the ‘Upload Plugin’ button 
  • Now, click on the ‘Choose File’ button 
  • Select the plugin file you downloaded earlier to your computer
  • Click on the ‘Install Now’ button
  • Once the installation is completed, click on the Activate Plugin
upload plugin

How to install Plugin through FTP Client?

Finally, the last one is through the FTP Client. This process is quite complete, as it goes through a huge process. Beginners may/ may not follow this method. But if you are an expert and familiar with these all, you can go through them.

So here we go, how to install the plugin through FTP:

  • Download your zip file of the plugin from the directory
  • Unzip the plugin file
  • Save the content to a folder
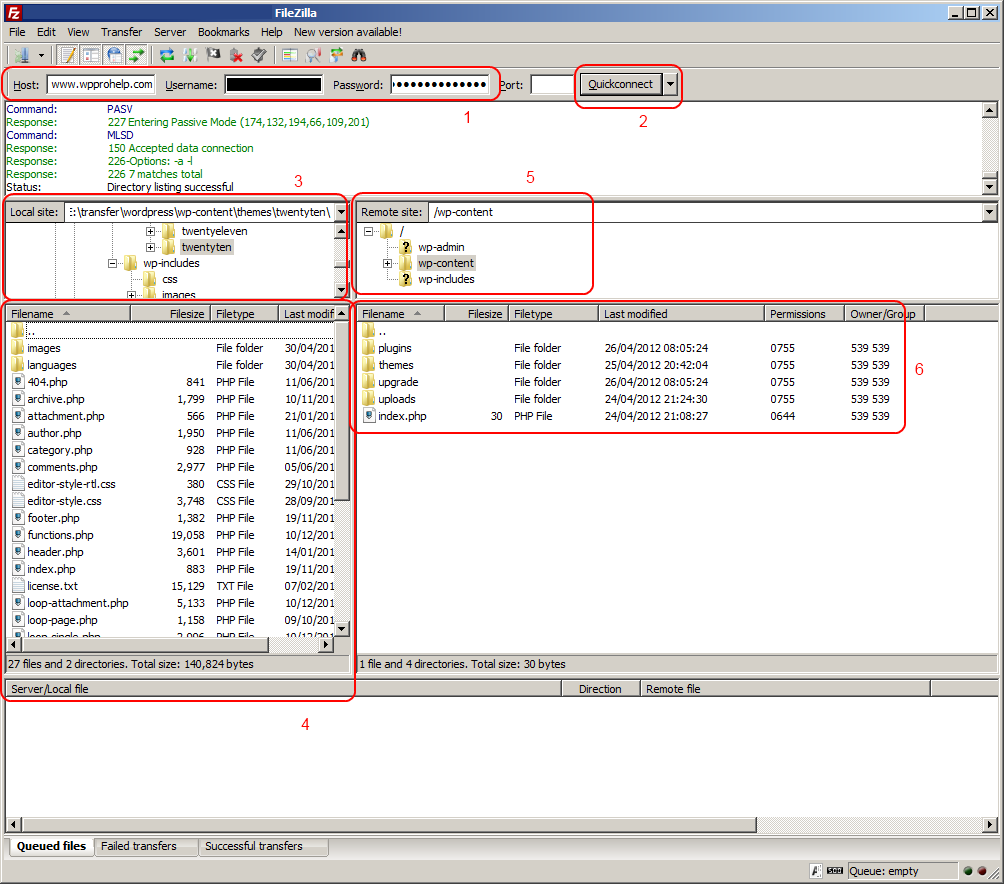
  • Establish an FTP connection to your hosting account
  • Navigate to the Remote Site panel
  • Scroll down and locate wp-content
  • Click on the Plugins button
  • Go to the Local Site panel
  • Open the folder where you store the plugin’s files
  • Upload the extracted files of the plugin
  • Once all the files are transferred, click on the Plugins button
  • Go to the installed plugin section
  • Search for your installed plugin and click on the activate button
ftp client

In this way, you can install your WordPress plugin through the FTP client process. 

Conclusion 

Well, we have described all three methods with which you can install a plugin for your WordPress website. The first two are beginners friendly. The last FTP client is quite vast, so it will be best for the expert. 

If you go through the above methods carefully, you can install the plugin very easily and quickly. We have mentioned each step-by-step process so that our visitors get it easier.

Hopefully, you all get the article helpful to you. In case you have any confusion or queries regarding any of the above installation processes, feel free to contact us. You can send us your questions through the comment section or contact us directly. We will get back to you as soon as possible.

Keep supporting us and follow us on Facebook and Twitter to get more interesting articles.

WooCommerce Vs BigCommerce – Two Popular eCommerce Platforms

If you are confused between WooCommerce and BigCommerce, for your new eCommerce website then here you are in the right place. Today in this article, we are going to take you through comparison between WooCommerce vs BigCommerce in terms of their features, advantages and disadvantages.

The given comparison helps you to choose the best eCommerce product for your site. Building your own online store doesn’t sound easy, but if you are selecting the best product, it can be a really simple process

So let’s get started with their brief description. Most of you are familiar with both eCommerce products, but still, let me give a brief introduction for the newbie. 

WooCommerce – Introduction

woocomerce

WooCommerce is free, flexible, and acceptable by a global community. It is the best option to start your eCommerce website.  With this, you can easily create beautiful, enticing storefronts with themes suited to your brand and industry.

WooCommerce comes with elegant features that help you to customize pages in minutes. Its modular product blocks just amazing, it helps you to give better customization to your site.

BigCommerce – Introduction

bigcommerce

Likewise, BigCommerce is a premium eCommerce website builder that is used by thousands of people to build their own online store. With this, you can tackle the complexity of growing your business and selling online.

BigCommerce helps you to design a beautiful eCommerce site with affordable payment processing. Moreover, it is built with single page checkout, custom URL structures, product reviews, and custom related product features.

Comparison of WooCommerce and BigCommerce

1. Ease of Use

ease-of-use

BigCommerce is very to easier to use and install.  Here you will get a proper base to build up your website. If you stuck anywhere, its support team is always ready for your help.

But due to some of its terminology, some users get it difficult.  It is a bit of a mixed bag and has a huge learning curve, so at first, you need to set a proper work plan. If you do so, it will be an easier eCommerce platform for you.  

Similarly, WooCommerce is also easy to use and it will surprise you with its user-friendly features.  From installation, setup to use, everything can be done smoothly.  And if you are choosing Bluehost for your site, it will be even easier as it will install WooCommerce for you in just few clicks.

Once you complete your installation, WooCommerce will take you through the onboarding process with its setup wizard.

Verdict

WooCommerce is easier to use than BigCommerce. 

2. Pricing

pricing

Pricing plays an important role in choosing any plugins for your WordPress website. Well, as we are comparing between WooCommerce and Bigcommerce, we need to know about the price of both eCommerce plugins. BigCommerce is a paid platform while WooCommerce is free.

Since WooCommerce is free to install, but if you don’t have your WordPress you might need to pay some cost for your startup. Suppose your business already has a WordPress site but needs more additional features rather than those which are available at the WooCommerce plugin.

For this, you need to upgrade your plugin to a premium version. And for a premium extension, you have to pay bills every month. Moreover, you need to pay for search engine optimization, complex payment processing add-ons, and others. Besides this, you need to buy hosting to ensure the flexibility of your site.

Likewise, BigCommerce comes with three different pricing plans. Its pricing starts from $29.95 per month. Since you are paying that much you will get extensive storage and bandwidth offerings, multi-layered service attack protection, server management, as well as HTTPS, and Level-1 PCI-compliance.

Along with this, you are getting search engine optimization and conversion tools.

Verdict 

WooCommerce has the best price compatibility comparing to Bigcommerce.

3. Compatibility

compability

WooCommerce is a WordPress plugin, so it is only compatible with WordPress websites. This e-commerce solution is useful for WordPress-based websites and allows them to use its toolkit with ease.

But if you are not working on the WordPress platform, you need to work harder and need to install a content management system. Once you install it on subfolders of your main site, you can continue your work further.

Like Woocommerce, BigCommerce is not limited to WordPress only. You can integrate with any other websites. since BigCommerce is an amazing e-commerce platform, you need not to use any specific content management system. 

Verdict 

If you are using WordPress, WooCommerce is the best option but for else others you should go with BigCommerce

4. Design Flexibility

design flexibility

The design of your site is very important to get huge traffic. So make sure your site is flexible enough in case of design. BigCommerce offers 12 free themes and 50+ coming on a one-off cost between $150 and $300. 

It sounds expensive, but on the other hand, it will show your brand. If you notice, you will get more repeat visitors to your site than the new one. So prepare to reflect on your first impression.

Its customization is far more straightforward. The plugin comes with an editing interface that lets you adjust things like text size and font, page layouts and navigation placement, and promotional banners.

WooCommerce has 20 themes in total, with 14 storefront themes. Among all, only 3 themes are free and the remaining cost between $39 and $129 each. Not only that, you also have to add storefront extensions which range from free to $59.

But if you are using a host like Bluehost, you can save some money. Their themes are more customizable, but you may need technical expertise. As WooCommerce has a responsive design, you can preview what your site will look like on mobile and tablet screen sizes at the top of the editor.

Verdict

Both are very close as both have their own strengths and weaknesses. But still, WooCommerce has the edge. 

5. Security Loopholes

security loophole

Everyone wants to keep their WordPress website secured from attacks. If you are using WooCommerce, let me tell you the security of the WooCommerce store is mainly based on your hosting provider. To maintain its security system, it offers free SSL certificates and CDNs for your store.

Likewise, BigCommerce is a certified PCI compliant platform. It helps you to keep your data secured from hackers. Here, you can also get the integration of the SSL certificate but for this, you need to pay some additional cost.

Verdict

Here also, WooCommerce is more secure at a low cost.

Pro and Cons

WooCommerce

Pros

  • Simple product listing
  • Lots of payment options
  • Easy to use
  • Limitless customization
  • Powerful SEO

Cons 

  • Too many updates 
  • Poor image management
  • Less  built-in features
  • More time to build and set up 
  • Less native shipment management functionality

BigCommerce

Pros

  • More built-in features
  • Enables you to sell across multiple channels like Facebook, Amazon, and Instagram
  • Puts a ton of focus on helping you learn 
  • No Hassle Speed and Security
  • Helpful Customer Service

Cons

  • No mobile app to run your store on the go
  • Hard editing interface
  • Pricing is tough, especially when budgeting for an online store
  • Poor product and Inventory Management

Conclusion 

Well, from the above comparison, it is clear that WooCommerce is better than BigCommerce. But still, it’s your choice which one to choose. Bigcommerce is also amazing, with a few points, WooCommerce wins the comparison.

I suggest you go through the above comparison so that you can get the best one for you. We hope you get this article helpful to you and cannibal to develop a powerful eCommerce website.

If you have any issues related to this article, feel free to contact us. You can send your queries through our comment section or directly contact us. We make sure all of your issues are solved as soon as possible. Keep supporting us and follow us on Facebook and Twitter.

You may like our article on how to add email subscription in WordPress blog.

How to increase subscribers in your WordPress site?

Do you have your WordPress website? If yes, you might want to get more subscribers to your site, isn’t it? To maintain the sustainability of any site, subscriber plays an important role. So by keeping this thing in mind, today we are going to discuss how to increase subscribers in your WordPress site.

Getting subscribers to your WordPress site is not difficult. But you know it will not come automatically on air. You must need to follow some methods. The best way to get subscribers is email marketing. It will get more subscribers in a very short time. But still, there are different methods and strategies with which you can get your subscribers.

Whether you are beginners or experienced ones, everyone wants huge subscribers on their site, isn’t it? So if you want to start growing your subscriber base, go through the following tips before you start.

Let’s get started:

The Importance of Increasing Subscribers

  • Direct contact with potential clients
  • More effective marketing schedule
  • Increased rate of return visitors
  • More focused on potential clients
  • The incredible chance of gaining more revenue

How to increase subscribers in your WordPress Site?

Here we have mentioned some of the useful methods which will help you to get more subscriptions on your WordPress website. Go through each of these methods. By the end of the article, I am sure you will be able to customize your WordPress website to get huge subscribers.

1. Launch a New Product

new product launch

If you want to increase your site subscribers, you just need to launch a new product. If you create a landing page, you will get potential customers. When you are creating a landing page, make sure it contains more information. If you make it convincing enough, you will be able to attract more visitors. And finally, easily convert your visitors into permanent subscribers.

2. Coming Soon Page

Another way to crack a subscriber is by creating a “coming soon” page. There are several ways to create a coming soon page, go through any of them. To hit any social media and digital marketing trial, a page will be required to attract people before your official launch. Such pages are simple, informative, and full of curiosity.

3. Install Unlock Opt-In Content Locker Lite plugin 

Unlock Opt-In Content Locker Lite is a free WordPress plugin that helps you to get subscribers.  It is easy to use and install, such that even beginners can deal with it very well. The plugin guides you to capture more subscribers right from your WordPress site. And this can be done just by locking some specific content of your site. To verify your subscribers, you can either go through link verification or directly unlock code verification. If you install this plugin, you can easily integrate the subscription form into your site which leads to huge subscribers.

Features:

  • Comes with two pre-designed subscription form templates
  • Design with two locker modes 
  • Provides two email verification methods
  • Option to enable/disable each form component
  • Subscribers CSV Export
  • Back-end form preview
  • Mobile responsive and user friendly
  • Cross-browser compatibility
  • Provides dedicated support
  • Translation ready

4. Contact Us Page

contact us page

The more you interact with your audience, the more you attract them. And the best way for interaction is “Contact Us Page”. So select the fine form plugin and create a contact form for your WordPress website. It is important to create a contact form because it allows you to discover how people are responding to your product.

Most businessmen prefer this strategy to get subscribers and gain insights into their audience. If someone wants to make a partnership to work on cross-promotional material, guest posts, or public relations questions, they will follow up with the contact us page.

So design a powerful contact us page which will be able to attract your visitors and convert them into your subscribers.

5. Get the Email

Getting Email

Getting an email is the best way to get subscribers. If you are wondering how, then stay to get more information. If you want more subscribers, just ask for an email rather than asking about their first name, no last name, no phone number, address, social security number, or blood sample.

Sometimes, users get panicked or irritated if you ask so much information. But subscribing with just a mail is quite easier and fearless. Once you get your subscriber, build a good relationship and then later ask for their personal details. 

You may also like to read 8 Best Mailchimp Alternatives.

6. Tell Them Why

Users have too many queries on every subscription. So if you are asking for a subscription, let them know about its advantages. If the users known what they are getting on their subscription, they will trust you and leave by subscribing to your website. For this you can say the following lines:

  • Sign up and get free updates from our blog.
  • Sign up for free tips on solving your most complex WordPress problems.
  • Subscribe and get free updates of our posts.
  • Sign up for our free weekly updates.

7. Utilize downloads within your content

Last but not least, you can increase subscribers in your WordPress site from download methods. Yes, you heard it right, download links can also encourage your visitors to subscribe to your WordPress website. For this you need to include some download links in the middle of your blog.

Make sure those links should prompt the users to another post related to your website. This will make them enter their email address to access the free download. And hence you will get another subscriber to your site.

Conclusion

Well, we did with overall methods which will help you increase subscribers on your WordPress website. If you follow the above tips, I’m sure you can convince your visitors and turn them into followers. Believe me, the above are the most effective tool to bring a great number of real subscribers to your web page.

I hope you get this article helpful to you. If you are getting any issues or have any queries, feel free to contact us. You can send your queries through our comment section. We will make sure all your questions are answered as soon as possible. To get more interesting articles, subscribe to our website and follow us on Facebook and Twitter.

How to submit the post from Frontend?

Do you want to submit the post from frontend of your WordPress website?

If yes, then you are on the right way. Do you want to allow your visitors to submit quality posts from the front end to your WordPress site? Well, you can do this all with easy access. You just need to follow our article. 

The very first thing you need to do is install a front-end post-submission plugin. Such a plugin allows you to submit an amazing post from the front end. Also, it includes a frontend dashboard, frontend editor and publishing, and frontend uploader for WordPress user profiles, post submissions, and memberships

If you visit the WordPress directory, you will get several frontend post submission plugins. But the list may confuse you, so we will move forward with  “Frontend Post Submission Manager”.

frontend post Submission manager - to submit the post from frontend

Before moving towards post-submission steps, let’s have a brief description of “Frontend Post Submission Manager Lite”.

What is Frontend Post Submission Manager Lite?

Frontend Post Submission Manager Lite is a free WordPress Plugin for frontend posts. It offers an amazing functionality option to submit the Post from the frontend. The best part is, to do this you need not log into any configurable options.

Features:

  • Design with Drag and Drop form Builder
  • Offers unlimited Custom Fields 
  • Custom Fields Frontend Display Support
  • Built with 5 Beautifully Pre Designed templates
  • Provides support for Guest Post
  • Integrated with Google Captcha
  • Comes with frontend Form Preview
  • Configure Post Format
  • Translation Ready

Download the Frontend Post Submission Manager

We hope you get enough idea about the selected plugin for today’s article. Now let’s get started with further steps:

Steps to Submit the Post From Frontend

Here, we will describe all the detailed methods to submit the post from frontend.

Install and Activate Frontend Post Submission Manager

First, you need to install and activate the plugin for front-end post submission. From the list of available plugins, we recommend to use Frontend Post Submission Manager. We have already discussed its features above.

  • From WordPress dashboard to go plugins
  • Click on Add New
  • Search plugin name, Frontend Post Submission Manager
  • Click on Install and then Activate.

Configure From

Now, you will get the two default forms. From the admin menu of Frontend post submission, you can go to All Forms.

Frontend post submission shortcodes
  • Go to All Forms
  • Edit the Form
  • Configure the required options from the settings
  • Click on the Form tab and add/remove the required form
  • Click on Save to save the changes.
Frontend post submission form page

Preview the Form

After making the form, you can copy the form shortcodes and paste them into the page.

Frontend post submission add shortcode
  • Go to pages
  • Add new page
  • Give the title and in the description, add the shortcode for the form.
  • Paste the shortcodes on the page
  • Click on Publish and view the page.

View Post on the Frontend

Frontend post submission front view

To view your post at the front end, you need to manage some programming settings. But as you have to install the frontend plugin, every programming is done by the plugin. The only thing you need to do is:

  • Go to page
  • Click on view on the frontend

After a while, you can see the add new post page displayed on the front end.

Configure and Publish the Page

Up to now, your page is displayed on the front end. Now for further process, follow the given steps:

  • Configure quick settings and appearance
  • On the left side, the Frontend Post Submission Manager Lite plugin will display a quick settings panel 
  • Select the page’s title, URL slug, template, and menu

Here you will get an option to hide different details. These elements may not be used to post blog entries. Let’s see what can you hide:

  • Add new post-text
  • Screen options and help dropdowns
  • Preview, status, visibility, publish immediately, and publish button.
  • Format dropdown

Hence above all elements can be hidden as per your requirements.

For any post, the most important and common elements viewed by users are the title field, the body field, and the save draft button. So you can hide the rest elements that are not needed for the post-submission. For this,

  • Click on hide element
  • Select the  elements you want to hide
  • Configuring the page’s quick settings and appearance
  • Click on save to publish the page
  • Allow your users to submit posts

Get  Your User Post Submissions

  • Publish your page
  • Allows your users to log in to submit their posts
  • With this, your users will have access to create their posts and submit them as drafts

Well, in this way, you can allow your user to submit your post from the frontend. For this article, we have used “Frontend Post Submission Manager Lite”. But besides this, there are still many more. Let’s have a brief description of some more such plugins:

Alternatives of Frontend Post Submission Plugins for 2021

AccessPress Anonymous Post 

https://wordpress.org/plugins/accesspress-anonymous-post

AccessPress Anonymous Post is a responsive frontend post submission plugin. It is easy to use such that even beginners can submit a Standard WordPress Post. The plugin comes with unlimited Custom Fields with all the forms fields like text field, text area, checkbox, radio buttons, select options, and others. 

Features: 

  • Dedicated forum support
  • Online chat support
  • Email support
  • Premium upgrades available
  • HTML5 submission form 
  • Allows you to save posts directly into the WordPress database

User Submitted Post 

User Submitted Post plugin is an amazing plugin to generate content for your frontend post.  With this, you can add a frontend form through a shortcode or template tag. Here the post submission form has fields such as name, URL, post image, email, custom field, post content, and others.

Features: 

  • Simple and user-friendly
  • Custom Post Content
  • Allows you to create unlimited custom forms
  • Deluxe form options
  • Option for email alerts, contact form settings, show/hide contents
  • Allows you to submit images and videos directly from the front end

WPForms 

Likewise, WP forms help you add frontend posts via shortcode. The plugin comes with videos, featured images, gallery posts, and images that make your post more attractive. Since the plugin is integrated with Google Captcha, your site will be protected from unwanted spam. If any user has logged in to the plugin, he/she can edit their profile in the front end. Also, they can add their profile picture without any Gravatar account. 

Features: 

  • Option to assign an author to the guest post
  • Visitors can submit the post from anywhere
  • Drag and Drop option for image posting
  • Option to include title, tags, URLs, images, videos, category, and the author in the post submissions
  • Integrated with Google Captcha
  • Comes with shortcodes

WP User Frontend

https://wordpress.org/plugins/front-end-publishing

WP User Frontend is an ideal Frontend Plugin. It allows you to publish posts from the frontend. You can also use it to build a job board, news site, classified site, directories, and book store. The plugin comes with easy to use form builder which helps to build advanced posting forms.

Features: 

  • Comes with an easy Visual Builder
  • Allows you to add different conditional logic
  • Design with three text areas: Normal, Rich, and Teeny
  • Offers Toggle Switches for checkboxes and radio field styles
  • Unlimited frontend dashboard
  • Multilingual ready

WordPress Frontier posts

https://wordpress.org/plugins/frontier-post

Similarly, the WordPress Frontier posts plugin is responsible for frontend standard posts. With this, you can enable front-end posting and editing on your WordPress blog. Since the plugin is easy to use, you need not go to the backend to create content. The plugin is highly configurable and customizes your post elegantly.

Features: 

  • Offers default category per role
  • Comes with an amazing widget to enable post-creation link 
  • Supports WordPress Post Status Transitions
  • Disable Admin bar per role
  • Offers User-defined templates for forms
  • Multiple pages with frontier-post

Conclusion 

Finally, we did with the overall process to submit a post from the front end. By using the frontend post submission plugin, your users can work and manage everything from the frontend. This plugin makes the WordPress frontend post submission smoother.

We hope you find this article helpful to you. If you have any further queries or suggestions related to our blogs, products, or services,  let us know via the comment section below. We make sure all of your questions are solved as soon as possible.

You may like, how to add email subscription in your blog.

Keep supporting us and follow us on Facebook and Twitter to get more interesting articles.